The thank you page – the page after conversion – is a part of a landing page, to which the user is directed after filling in the form. The default thank you page has a variable URL.
What is the thank you page?
Thank you page is a page where the user will be redirected after completing the form on your landing page.
For all landing page templates with forms available on our platform, the thank you page’s graphic design is already prepared. Remember to change the content on such a page. If you create a landing page from an empty template, you should design the thank page yourself.
We recommend using elements and colors similar to those used earlier on the main page.
How to edit a thank you page?
You can edit both the thank you page and the main page in the editor.
1. Go to the editor of the selected landing page and click on the Thank You Page tab.

TIP: You can copy and paste items from the main page (individually and in groups) using the Copy (Ctrl+C) and Paste (Ctrl+V) key combination. You can also hide elements in selected views.
On the thank you page, you can use all widgets except the form.
2. After adjusting the content and images, save the changes and/or publish the landing page.
Remember that you can only access the default thank you page if the main landing page contains a form.
Dynamic and static TYP URL address
Default TYP with dynamic URL
The URL address of the default thank you page is dynamic and contains a unique ID for each new lead.
An example URL address of the default thank you page looks like this:
- mylandingpage.com/send?hash=9915b9c8at65849eirjf
- /send?hash= here it’s a standard formula followed by a unique ID for each lead.
Custom TYP with static URL
If you want to have a permanent (static) URL of the thank you page, we suggest creating a separate landing page as a customized thank you page to which the user will be redirected after the conversion (filling in the form).
If you do not insert a form on your landing page, its thank you page will be inactive. In Landingi, you can combine more landing pages and create sales funnels.
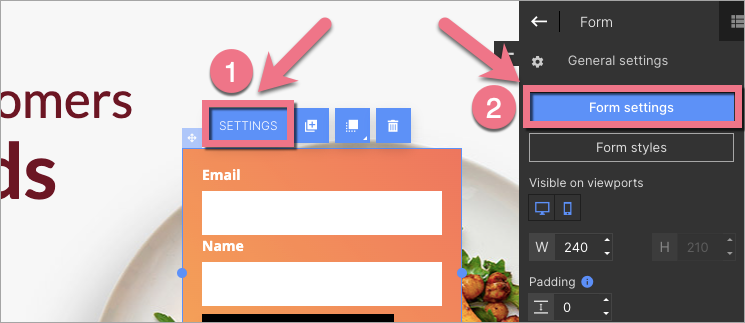
1. To choose the action after form submission, click on the Form and go to its Settings from the context menu (1) or the widget toolbar (2).
2. Go to the Next action tab.
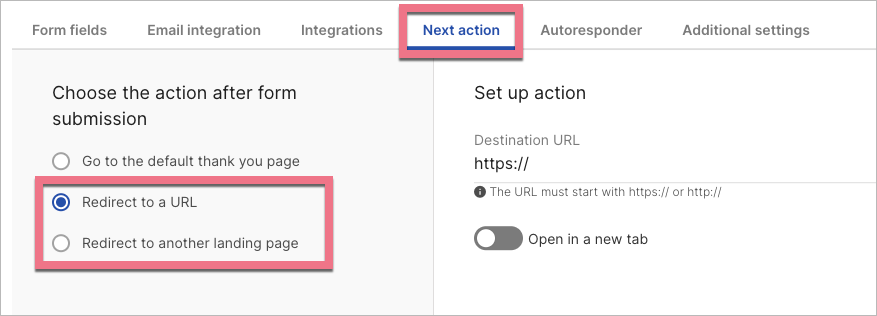
3. Choose Redirect to a URL or Redirect to another landing page. Paste the external page URL or choose your target landing page.
4. Save and close. Then publish the landing page.
You can add a referral link to a conversion page (thank you page) to track a landing page referral process by those who filled out a form.