HubSpot is a popular sales and inbound marketing platform that can be easily integrated with the Landingi platform to convert potential customers and close sales successfully. This integration supports custom form fields.
The HubSpot OAuth integration lets you integrate with a few clicks.
With HubSpot integration, you can assign users to submitted leads and create new deals.
- You can find your leads in the Contacts tab.


- You can manage your deals in Sales > Deals.


Integrate your form with HubSpot
1. Log in to your Landingi account and navigate to the editor.
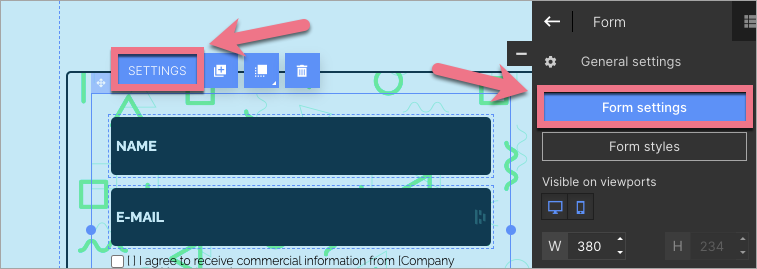
2. Click on the form and go to its Settings.
3. In the Integrations tab, select HubSpot. You can use the search bar to look for the integration. Type the name and press enter.

4. Click Add new connection.

5. In a pop-up window, log in to your HubSpot account, choose which account you want to connect with your form, and click Choose Account. If you do not see the new window, check if your browser allows pop-ups.

6. In the next window, confirm the connection with your account by clicking Connect app.

7. Your Landingi account is now integrated with your HubSpot account via a unique code. You will be able to use it multiple times – each time you integrate your form with HubSpot.
8. Your new code will be automatically selected in the drop-down list (1). By default, the Assign owner (2) option is selected – that way, you can select a user (3) in HubSpot to automatically assign new leads to them. The unchecked Assign owner option disables the assignment of a contact owner. Check Create deal if you want to create a new deal in HubSpot (4).
Next, match the form fields with the values in HubSpot.

9. From now on, whenever you configure a form, you can use this connection without having to log in again.
10. When you’re done, click Save and close and publish your landing page.
Fill in the form to check if the integration is working correctly and if data is uploaded to your HubSpot account.
IMPORTANT: Make sure that leads (contacts) are added to your marketing lists in HubSpot. Read how to add or remove contacts from a list in HubSpot.
Browse all integrations in our Integrations Catalog to see tools you can connect Landingi with.

