Everybody’s talking about how measuring traffic on a landing page is crucial, but there seems to be a problem with finding an actual way to do so. In this article I’m going to show you how to make it possible. There are five things you need to learn in order to effectively measure traffic on a landing page.
- Install Google Analytics on a landing page
- Install Facebook Pixel on a landing page
- Link Google Analytics with Google Ads
- Set conversion goals in Google Analytics
- UTM tags outside Google Ads campaigns
A few months ago Andrew was writing about how to use Google Analytics to measure a landing page’s performance. Today, we’re going to get more specific and technical. In other words, I’m going to show you how to measure website traffic.
Install Google Analytics on a landing page
First things first. Let’s begin with creating a Google Analytics account (if you don’t have one already). If you get lost during the process, check out this guide directly from Google Support.
The next thing you should do is to get your Tracking ID – it’s your account’s personal number that from now on will be used to measure the traffic and general performance of all your websites and landing pages (connected to your Google Analytics account).
How to find your tracking ID? Log in to your account and click the “Admin” tab. Then look at the middle column and click on “Tracking Info”. Select the “Tracking Code” option:

Once you got your Tracking ID, it’s time to find the Google Analytics code. Get it from here.
Remember to replace “GA_TRACKING_ID” with your Tracking ID.
Now log in to the Landingi platform and head to your landing page Dashboard:

Select the “Javascript code” tab and click on the “Add script” button. You should see a form where you can paste your tracking code and choose various options. Fill it in like this:
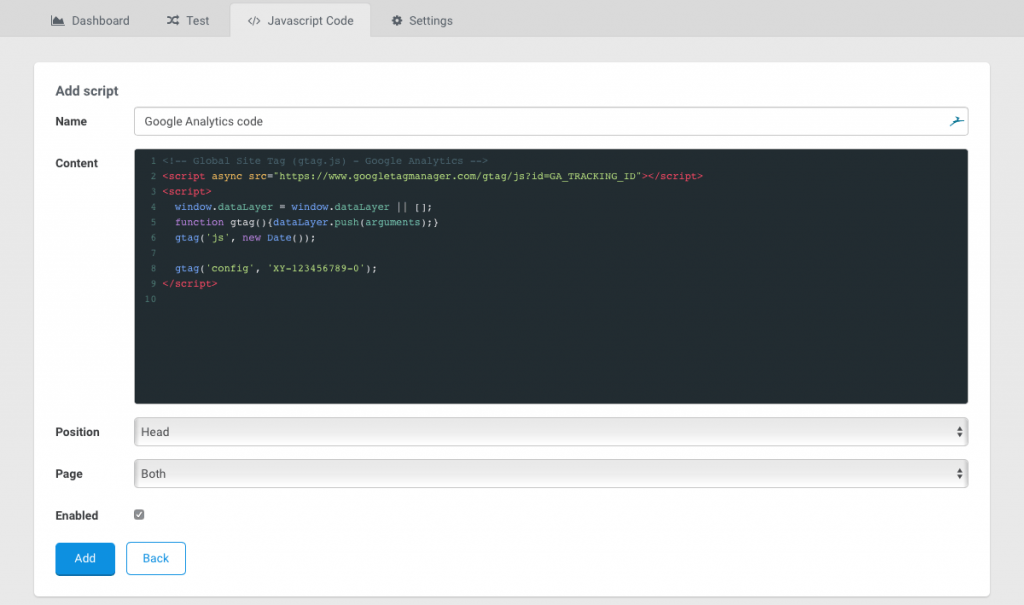
- Name – it’s just what it says, a simple name of your script.
- Content – here’s where you paste the code. Look for your own Tracking ID in line 8 (so it looks like: gtag(‘config’, ‘YOUR-ID-HERE’);
- Position – always aim for the head
- Page – choose both to track traffic on the main page and the ‘thank you’ page as well
- Enabled – uncheck this box if you want to temporarily disable your custom javascript
That’s it! Your landing page now will be monitored by Google Analytics and all the results should appear on your GA account.
Just to be sure, open your landing page in one tab, then switch to Google Analytics in a different tab and check Real-Time Reports (under “View”) to see if your visit is being recognised. If something’s wrong at this point, check this support note.
If you know exactly how to drive traffic to your website, this is a great time for it, because now you have the tools to see if it works like you expected! Let’s gather a bit more advanced data and expand, say, to Facebook Ads.
Install Facebook Pixel on a landing page
Doing your best to increase website traffic means expanding to different areas, such as social media. Facebook Ads is one of the biggest ad tools alongside Google Analytics – we don’t know what the future will bring, but currently not using Facebook Ads seems like a bad idea.
We know for sure that Facebook Ads can be very effective, but only if set up properly. Trying to take some shots in the dark usually ends up being a waste of money. But there is a solution that helps in targeting campaigns on Facebook and makes remarketing much more relevant. It’s called Facebook Pixel.
Generally speaking, Facebook Pixel is very similar to Google Tracking ID – it’s a piece of code you can paste to your landing page or website to allow Facebook to track visits and performed actions.

To get your Pixel, you need to have a Facebook Business Account. If you do, log in and click “Pixel” in Events Manager. Click the green “Create a Pixel” button and that’s it! Now you’ve got your ID and you can paste it into your landing page or any other website.
Reminder: the Facebook Pixel code should be pasted as close to thetag as possible.
If you want to do link Pixel with your LP on the Landingi platform, do it exactly like you did with the Google Tracking ID: log in to your account, select one of your landing pages and in the dashboard click the Javascript Code tab. Paste your Pixel there. Remember to choose “head” in the Position field and “both” in the Page field.
Link Google Analytics with Google Ads
Let’s actually start using Analytics to run Ads. On your Google Analytics account, click on “Admin” and select “Google Ads Linking” in the middle column:

Now click on “New Link Group” and select an Ads account you want to link your Analytics to and link it with specific view(s). After you set up everything, head on to Acquisition > Campaigns > All campaigns and get access to full statistics. That’s it!
Set conversion goals in Google Analytics
Sometimes clicking the button is not exactly the conversion we’re looking for. This is why we can set custom conversion goals in Google Analytics – and this is how we do it. Once again, click on “Admin”, then head on to “Goals” (right column). Click on “Add goal” and configure it using the template or custom option:

There are four goals you can set:
- Destination – that means going to a specific page
- Duration – how much time visitors spend on your landing page
- Pages/Screens per session – how many pages they see during a single session
- Event – a specific action users perform (video play, button click, file download, form fulfilment etc.)
Event goal
If you need to set up an onClick event goal for one of your landing pages, I will gladly guide you through the process.
First, you need to log in to your Landingi account, choose a landing page and click on the “Edit” button. Once you’re on your LP, hover the mouse cursor over the button and click settings. Then choose the “Settings” tab on the left and paste an onClick code.. Here’s an example:
ga(‘send’, ‘event’, ‘Category’, ‘Action’, ‘Label’, ‘Value’,);

Don’t forget to replace “category”, “action” and “label” with your own, e.g. “button”, “click” and “signup”. Now, go back to Google Analytics, to the same spot we talked about before.
Select an event and fill the fields with the exact same information as in the piece of code you’ve pasted in the button settings on the Landingi platform:

Keep in mind that Category and Action are required fields – the rest are fully optional.
UTM tags outside Google Ads campaigns
UTM tags are these little, but extremely helpful, things that we really shouldn’t underestimate. With no more than five parameters we can tag every link and make tracking it as easy as pie.
Five things we can track with UTMs are:
- Campaign name – used for distinguishing different campaigns from each other. Examples: black_friday, annual_sale, product.
- Campaign source – this parameter tells us where a link comes from. So if you include the link on Quora, you’d want to set the utm_source for “quora” or “quora.com”. If it’s on Facebook, do the same. Examples: facebook.com, newsletter, website.
- Campaign medium – it points to a place from which a user got to your page and for an action that they performed to get there. It could be a click-on banner or a link included in a Facebook post. Examples: email, social, banner.
- Campaign term – use it to mark keywords used in your ad – names of products or categories. Examples: xbox, books, autumn.
- Campaign content – it is used to distinguish different variants of the same campaign. This tag is extremely useful while running an A/B test. Examples: widebanner, squarebanner, greensign, bluesign.
Notice: every UTM tag has to be written in the exact same way. Each spelling mistake creates another tag to be tracked by Google Analytics. Also, they are case sensitive, so “Quora” will be completely different from “quora”. Keep that in mind.
The great thing about UTM tags is that you can (and you really should!) use them even with no Google Ads running. Let’s say you’re using paid ads only on Facebook or don’t do it at all for the time being. That doesn’t really matter, because UTMs work anyways – you can log in to Google Analytics and track how your landing pages perform.
Also, if you’re looking for more advice on how to drive, manage and increase website traffic, check out our recommended posts below.
In case you need landing page templates to start with, you may want to test Landingi – a flexible, all-purpose tool to create, edit, publish and maintain landing pages.