CallPage is a tool made to help you communicate with your clients. With the CallPage widget, you can provide immediate free phone callback to your leads in 28 seconds.
This guide will walk you through adding the CallPage widget to your landing page in Landingi.
Get your CallPage installation code
1. Log into your CallPage account. From the left-side menu, select the Widgets (1) tab. If you do not have any widgets yet, you can start one by clicking Create widget (2).

2. Go to the edition of widget settings.

3. In General settings, you can manage the site’s URL address and widget name. If you change anything, remember to Save it.

4. From the Installation tab, copy the whole installation code.

Install the code in Landingi
1. Go to the Dashboard of your landing page in Landingi.
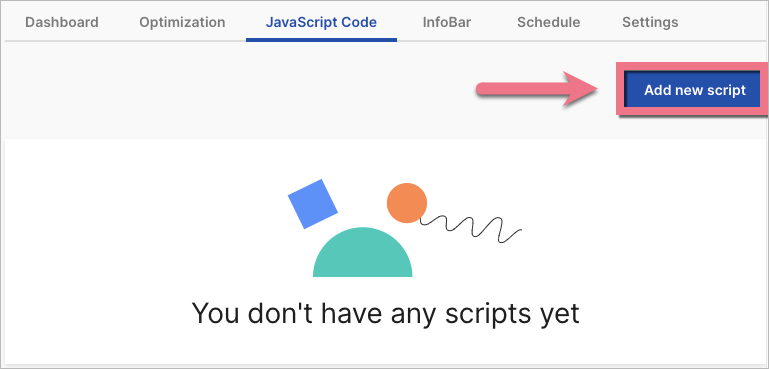
2. Navigate to the JavaScript Code tab and click Add new script.
TIP: You can enter Dashboard and JavaScript Code tabs directly from the editor.

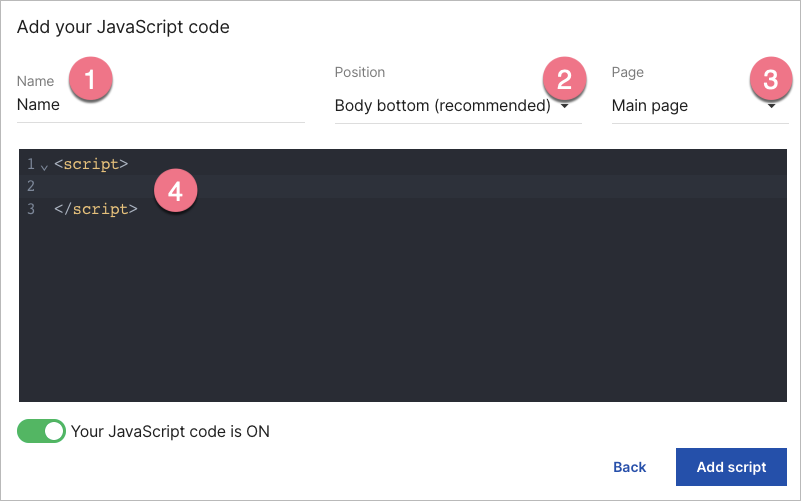
3. Name (1) your script and choose the Body bottom (2) position on the Main page (3). Paste your code in the content field (4).
As a Page (3), you can also select either a Thank you page or Both, depending on where you want the widget displayed.
4. Save by clicking Add script.
5. To ensure that the CallPage widget displays correctly on your landing page, you also need to add a custom CSS code. Go to the editor and click the arrow to open the Page Settings from the panel on the right.

6. Click Add custom CSS.

7. Paste the below code under Main page or Thank you page, depending on where the CallPage widget is placed. Then Save & close.
#callpage > div.cp-button-section.cp-callpage__button,
#callpage > div.cp-callpage__widget-wrapper.js-cp-callpage__widget-wrapper,
#callpageWrapper #callpage > div.cp-callpage__bg {
    z-index: 200000 !important;
}
8. Publish your landing page.
9. You can check if the installation is correct by clicking Check installation status in CallPage installation settings.

The CallPage widget will start working on your landing page immediately.

CallPage settings
There are several more settings you should edit.
1. Widget’s view – edit the look of your widget, colors, texts, fields, etc.

IMPORTANT: Remember to Save every change you make.

2. Calls – manage general settings, playbacks, SMS settings, and enabled countries.

3. Scoring rules – set up rules to classify leads by quality.

4. Teammates – add teammates, set the working hours, and prioritize certain teammates for calls.

Changes do not require replacing the code. However, remember to Save them.
5. In the Leads tab, you can find all the details regarding your calls and meetings.

Browse all integrations in our Integrations Catalog to see tools you can connect Landingi with.

