Product

Create, publish and optimize pages with a drag&drop, pixel perfect and mobile-friendly builder

Speed up the creation process with 400+ customizable templates for landing pages, pop-ups and sections

Track microconversions in your Dashboard and analyze events and clicks with visual map

Integrate your pages with your favorite mar-tech apps and solutions to get the flow of your campaign going

Drive sales and conversions with irresistible product displays and seamless shopping experiences

Use a reliable and secure platform that smoothly handles millions of visits

Solutions

How to generate more traffic and get more leads.

How to reach global audience with language versions of landing pages.

How to take care of your digital footprint.

How to publish non-generic, handcrafted pages.

How to manage larger volumes of pages and clients.

How to deliver personalized content to potential customers.

Resources

Master digital marketing with the help from savvy professionals and increase your website’s conversions

Guides for beginners, set-up instructions and creation tips to get started and optimize your pages

A free online course for landing page creators! Learn the secrets of high-converting pages and become an expert

Get the answers you’re looking for – contact us

Schedule a one-on-one meeting with us and learn more about the benefits of our platform

Hire a Design Expert or order an import of your existing page from other platforms to Landingi

Home Help Center Schedule and post-campaign redirection

Schedule and post-campaign redirection

TABLE OF CONTENT

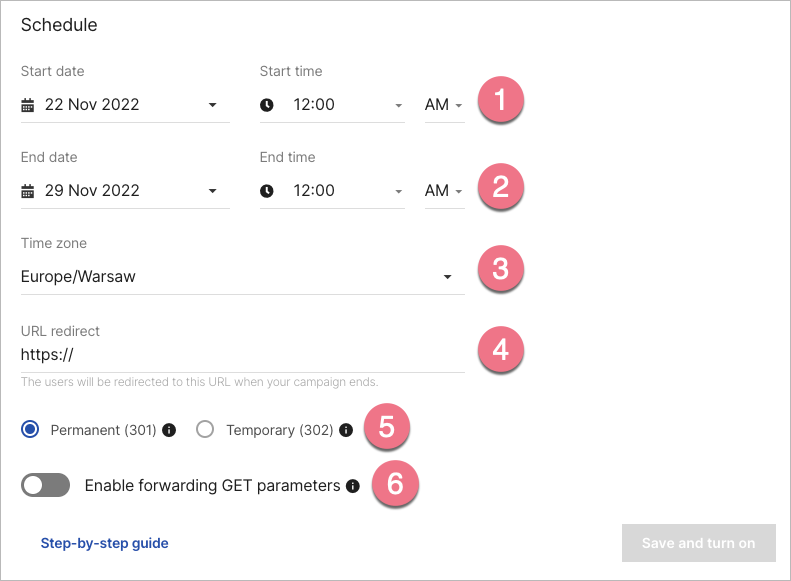
With the campaign scheduler, you can automatically launch and stop your campaign at a specific time without having to manually disable the landing page. You can also use the scheduler to set up 301 or 302 redirects.

How to set the scheduler

1. Navigate to the Dashboard of your landing page, and go to the Schedule tab.

2. You can now:

  1. Set the start date and time of the campaign. Before the start date, the users will see the 404 error page.
  2. Set the end date and time of the campaign.
  3. Choose a time zone (by default, your account time zone is set).
  4. Redirect the user to another page after the campaign ends.
  5. Set forwarding type to permanent (301) or temporary (302);
  6. Enable GET parameter transfer.

NOTE: The type of redirect matters for SEO:

  • 302 redirect: is a temporary redirect; The initial page and the redirect page will appear in Google search results. Choose this type of redirection only when you know that you will want to undo the redirection after some time.
  • 301 redirect: is a permanent redirect; Google will remove the initial website from its index. Choose this if the page is supposed to be redirected over a long period of time (or forever). This type is much better when it comes to the SEO score.

3. To enable the schedule, click Start and turn on.

4. To stop the schedule, click Turn off (1). At any time, you can change the schedule configuration and Save changes (2).

Redirect after countdown ends

You can set a redirection after a countdown. To do this, set up a Counter widget and enter the address for the redirect.