Google reCAPTCHA is anti-spam protection that helps to distinguish Internet bots from real users. In Landingi, there are two ways you can activate reCAPTCHA protection: using reCAPTCHA v3 for all landing pages (visitors do not have to take any action) or adding reCAPTCHA v2 to a form (visitors have to manually confirm they are not robots).
See also other methods of spam protection:
What’s the difference between reCAPTCHA v2 and v3? Which is better?
reCAPTCHA v2 and v3 are both tools created by Google to prevent spam and malicious activities on websites. The main difference is how they work. reCAPTCHA v2 often asks users to solve puzzles like clicking checkboxes or identifying images to prove they’re not robots. On the other hand, reCAPTCHA v3 runs in the background and assesses user behavior on a site to determine if they’re genuine or not, without requiring any interaction.
Which one is better depends on the specific needs of a website. v3 is more user-friendly since it doesn’t disrupt user experience, while v2 might be better for cases where more precise user verification is needed.
reCAPTCHA v3 for all landing pages
reCAPTCHA v3 in Landingi is activated in account settings and works for all your landing pages, with the option to choose the reCAPTCHA badge’s placement on either the left or right side of the screen.
1. Log in to your Landingi account, click your profile name, and select Settings.

2. Find the reCAPTCHA section. Choose the position (1) of the badge and click Save and turn on (2).

3. At any time, you can turn off the reCAPTCHA for all landing pages (1) or make and save changes (2).

The reCAPTCHA v3 badge will be visible on all your landing pages with a form.

reCAPTCHA’s position on an individual landing page
1. You can change the badge’s position for an individual landing page in its Page Settings. In the editor, find the reCAPTCHA tab in the right-side menu and unfold it.

When editing, you can go back to Page Settings by clicking the arrow:
2. Select the position of the reCAPTCHA badge for this landing page.
3. Remember to publish your landing page.
reCAPTCHA v2 for one form
reCAPTCHA v2 in Landingi is added in form settings. You have to configure it for each form/landing page independently.
Get your Google reCAPTCHA v2 keys
1. Open the Google reCAPTCHA site, and go to My reCAPTCHA.
2. Register new site: enter your label (name) and domain. Choose reCAPTCHA v2 and a checkbox below.

3. Enter your email address, accept the terms, and click Submit.
4. Now you can copy Site key and Secret key.

5. Go to the editor in Landingi.
Activate reCAPTCHA on a landing page
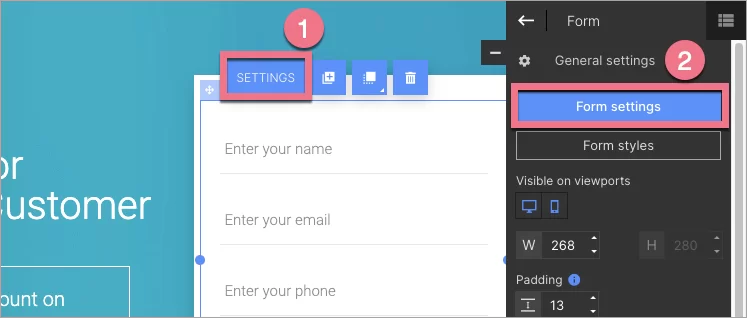
1. Click on the form and enter its Settings from the context menu (1) or the widget toolbar (2).
2. Go to Form fields, click Add element (1), and select reCAPTCHA (2).

3. Paste the keys.

4. Save and close. Publish your landing page.

The reCAPTCHA v2 field will be visible in the form.

