You can turn on email validation on your landing page to block nonprofessional email addresses. By blocking custom email domains in the form, you can avoid spam leads.
See also other methods of spam protection:
Add email domain validation
1. To add email validation to your form, you need form button and email field IDs. To find them, go to your published landing page, right-click next to the form and select Inspect.

2. An HTML code window will open. Click on the select tool (1) and hover over the email field (2). The part of the code relevant to the field will be highlighted. Copy the email field ID (3).

3. Then hover over the button and copy its ID.

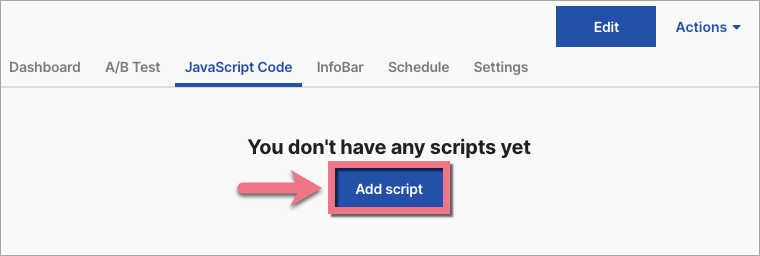
4. Go to the landing page Dashboard and navigate to the JavaScript code tab. Click Add script.
You can access the JavaScript code tab also directly from the editor:

5. Copy the code indicated below.
Change DOMAIN1 and DOMAIN2 to the domains you want to block, e.g. @domain.com, @gmail.com (you can specify only one domain or as many domains as you need).
Change FORM_BUTTON_ID and EMAIL_FIELD_ID to relevant IDs copied from your landing page.
<script>
$('.keywordError').hide();
let triggerWords = ['@DOMAIN1', '@DOMAIN2'];
let buttonColor = '#FORM_BUTTON_ID';

function containsBannedWords(input) {
    let result = false;
    triggerWords.forEach(function(triggerWord) {
        if (input.toLowerCase().includes(triggerWord)) {
            result = true;
        }
    });
    return result;
}

function debounce(func, wait) {
    let timeout;
    return function(...args) {
        clearTimeout(timeout);
        timeout = setTimeout(() => func.apply(this, args), wait);
    };
}

$('#EMAIL_FIELD_ID').keyup(debounce(function(event) {
    if (containsBannedWords(event.target.value)) {
        $(event.target).prop('value', "");
        $('.keywordError').fadeIn(500);
        $(buttonColor).css('background-color', 'red');
    }
}, 300));
</script>
6. This code changes the button color to red by default when an invalid email address is entered. You can set your own color by replacing red in line 28 with your chosen color code, for example:

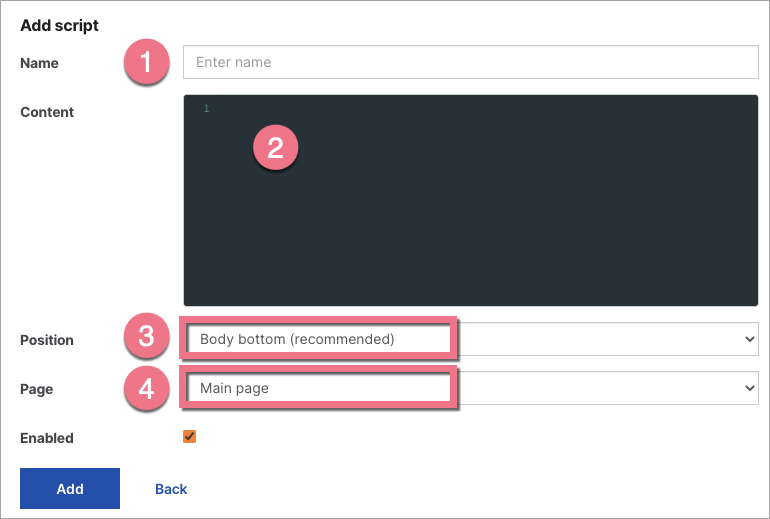
7. Name (1) the script and paste the code in the Content (2) field. Choose the Body bottom (3) position on the Main page (4). Save by clicking Add.
8. Go back to the landing page editor.
9. Add a Text widget and place it beneath the email field. Type an error message that will show when someone enters the email address you want to block.

10. Then go to the Other tab in the right-side toolbar. Type keywordError in the Classes field.

11. Publish your landing page.
Fill out your form and check if the validation works correctly.

