In Landingi, you can publish your landing page to your own subdomain. A free Let’s Encrypt SSL certificate will be automatically added for every correctly installed subdomain.
- Before you start the configuration, add the subdomain in Landingi.
- If this is your first time configuring domains in Landingi, see how to get started with domains.
This guide will show you how to set up a domain registered with cPanel.
cPanel is one of the most popular Linux-based control panels for web hosting accounts that lets you conveniently manage all services in a single place. Some domain providers allow access to DNS records only via cPanel.
The overall display of cPanel may vary slightly depending on the domain provider.
Access the DNS management zone in cPanel
1. Log in to your subdomain portal. Usually, you can access the cPanel from the Hosting zone. You can always log in directly to cPanel. The example below shows the access to cPanel in Hostgator.

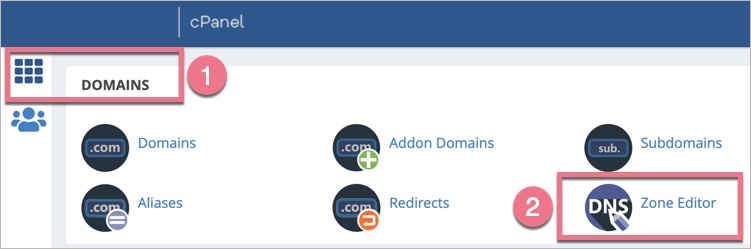
2. Click on Domains (1) and go to the Zone Editor (2).
3. Find your domain and select Manage. You’ll see a list of DNS records.

Set up the DNS records
Now you need to configure the DNS records – select the type of your subdomain.
I’m setting up a www subdomain
Before you start, read about www subdomain redirection.
1. Add two A records: one for your root domain and one for the www subdomain. If you already have these records, edit their values (and change the Type if set to CNAME). New records are added to the very bottom of the list.

2. Copy and paste the values below.
- Enter your domain name and add a dot at the end.
#1 Type A
Name:
domain.com.Record:
157.53.227.1#2 Type A
Name:
wwwRecord:
157.53.227.1I’m setting up a subdomain other than www
1. Add an A record for the subdomain you want to add to Landingi. If you already have this record, edit it (and change the Type if set to CNAME).

2. Copy and paste the values below.
- Type in your new subdomain name, e.g., portfolio for portfolio.yourdomain.com, and the system will automatically fill in the root domain name
Type A
Name:
your subdomain nameRecord:
157.53.227.1Finish the configuration in Landingi
When you’re ready, go back to Landingi and click on Confirm/Finish.
Once you’ve added the subdomain to your account, our system will verify whether the DNS redirections have been done correctly. During this time, an hourglass icon will be visible next to the domain with the information that the domain is being verified. Usually, the domain will be active a few hours after adding it, but the total waiting time depends on the number of domains in our system waiting in the queue to install the certificate. We will email you when the domain is installed correctly.
A green globe icon indicates an active domain. You can assign it to your landing page.
In some cases, you have to wait between 1 and 24 hours for the records to propagate.

