If you run advertising campaigns on Facebook, you need to verify domain ownership for your landing pages. You can do this in three ways:
- by adding meta tags to your landing page;
- by updating the DNS TXT record;
- or by uploading an HTML file to your root directory.
In this guide, you will learn how to verify your landing page with meta tags and the TXT record.
You can only verify ownership of the root domain. For example, if your landing page address is: https://www.mycompany.com/voucher, add only the root domain name in the appropriate field when adding a domain, here: mycompany.com.
Add your domain
1. Go to Business Settings of your Facebook Business Manager.
2. Go to the Brand Safety tab and choose Domains.

3. If you don’t have any domains yet, click Add.

4. Enter your domain and click Add.

Now, you can verify your page with a meta tag or with a TXT record.
Verify with meta tag
1. Select the verification option. Choose Add a meta-tag to your HTML source code.

2. Copy the meta tag.

Do not close this window.
3. In a new browser tab, open the editor of your landing page and navigate to Page Settings.
When editing, you can go back to Page Settings by clicking on the arrow:

4. Find the Meta tags tab and unfold it.

5. Paste the meta tag in the field. Click the plus icon (+) to confirm.

If needed, you can delete (1) the meta tag or edit (2) it.

6. Publish your landing page.
7. Go back to your Facebook Business Manager and click Verify Domain.

Verification may take up to 72 hours. In case of delays, try to finish the verification the next day.
Verify with TXT record
1. Select the verification option. Choose Update the DNS TXT record with your domain registrar (1). Then, copy the record (2).
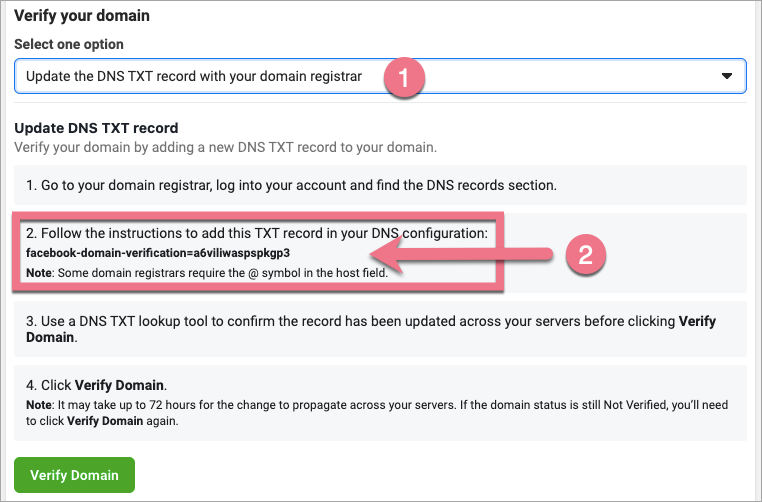
2. In a new browser tab, log in to your domain provider panel. Go to the edition of DNS records. Add a new TXT record to the root domain and paste the record copied from Facebook. Save the changes.
3. Go back to Facebook Business Manager and click Verify Domain.

Verification may take up to 72 hours. In case of delays, try to finish the verification the next day.
- If you need to verify your domain ownership in Google, read how to verify your page with Google Search Console.
- Don’t forget to optimize your landing page for search engines.

