Enlarging images or buttons only when you hover your mouse over them draws attention to the widget. In Landingi, you can add the effect to your landing page with a custom CSS code.

Add a custom CSS code
1. Log in to your Landingi account and go to the editor of your landing page.
2. Click on a widget and in the right-side toolbar, find the Other tab. Enter enlarge-on-hover in the Classes field.

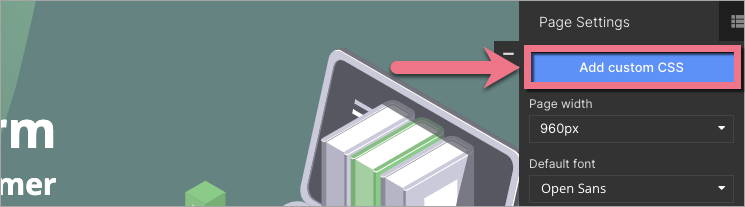
3. Go to the Page Settings and click on Add custom CSS.
When editing, you can go back to Page Settings by clicking on the arrow:
If you want to learn more about adding CSS code, read our guide about custom codes.
4. Paste the following CSS code:
.enlarge-on-hover {
webkit-box-shadow: 0px 15px 40px 0px rgba(0, 0, 0, 0.25);
-moz-box-shadow: 0px 15px 40px 0px rgba(0, 0, 0, 0.25);
-o-box-shadow: 0px 15px 40px 0px rgba(0, 0, 0, 0.25);
-ms-box-shadow: 0px 15px 40px 0px rgba(0, 0, 0, 0.25);
box-shadow: 0px 15px 40px 0px rgba(0, 0, 0, 0.25);
-webkit-transition: ease-in-out 0.2s;
-moz-transition: ease-in-out 0.2s;
-o-transition: ease-in-out 0.2s;
-ms-transition: ease-in-out 0.2s;
transition: ease-in-out 0.2s;
}

.enlarge-on-hover:hover {
webkit-box-shadow: 0px 15px 65px 0px rgba(0, 0, 0, 0.35);
-moz-box-shadow: 0px 15px 65px 0px rgba(0, 0, 0, 0.35);
-o-box-shadow: 0px 15px 65px 0px rgba(0, 0, 0, 0.35);
-ms-box-shadow: 0px 15px 65px 0px rgba(0, 0, 0, 0.35);
box-shadow: 0px 15px 65px 0px rgba(0, 0, 0, 0.35);
transform: scale(1.015);
}
5. Save & close. Then publish your landing page.
Check if the enlarge-on-hover effect works correctly.

