Meta pixel is a code that you add to your landing page to receive information about the actions taken on your landing page. It helps you to boost the relevance of your campaigns to your audience.
You can integrate your landing page with Facebook to track conversions and manage the analytics. In Landingi, you can do this in three ways:
- integrate via Facebook Pixel,
- integrate via Facebook Conversions API and Zapier,
- integrate via Pixel ID and Conversions API token (in-app integration)
This guide will show you how to set up the integration with Meta pixel.
Get your Meta pixel
1. Go to Events Manager.
2. Click Connect Data Sources.

3. Select Web and Get Started.
4. Select Facebook Pixel and click Connect.
5. Add your Pixel Name. You can also enter your website URL to check for easy setup options. Click Continue.
See also how to install Meta pixel on a pop-up.
Install the pixel in Landingi
1. In a new window, select Install code manually.
2. Copy the pixel base code.

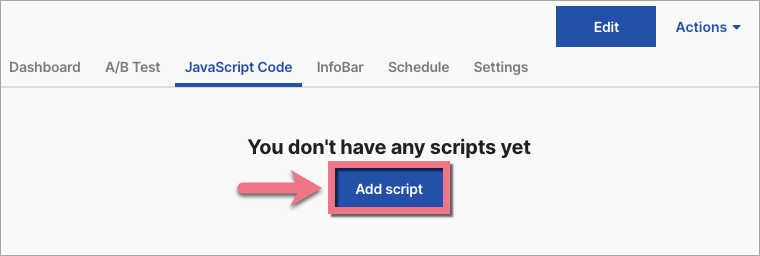
3. In a new tab, log in to your Landingi account and navigate to the Dashboard of your landing page.

4. Go to the JavaScript Code tab. Click on Add script.
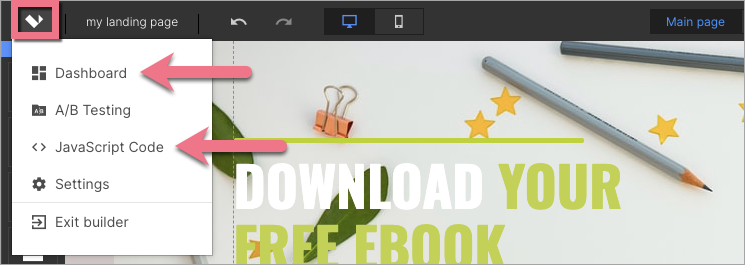
You can also access the JavaScript codes section directly from the editor of your landing page.
5. Type in a name (1). Paste the code (2), and select Head (3) and Main page or Conversion page (4). Click on Add.

6. Once you add the code, publish your landing page. Go to the editor and click on Publish.
7. Go back to Events Manager. Click on Continue.
8. In the next step, you can choose Automatic Advanced Matching and verify the customer information you want to send.
Track events – basics
Events are actions that take place on your site. Standard events are predefined by Facebook and allow you to record conversions, optimize for conversions, and create audience groups. The base code only includes the page view event.
In the Landingi platform, events are installed manually using a snippet. If this is your first time configuring Facebook pixel settings, you can close the next window.
Here you can find the list of snippets for standard events.
Copy a standard event code from the list, such as:
fbq('track', 'Contact');Track events on pages
1. Go to the Landingi platform and enter the JavaScript codes of the landing page again.
2. Edit the code for the Facebook pixel.

3. Paste the event code at the end of the base code (before the closed </script> tag). You can paste multiple codes, one below the other. Then Save and close.
4. If you want to track an event on the main page and another only on the conversion page, create two separate scripts. Each should contain the base code and the corresponding event code.
5. Go to the editor and publish the landing page again.
6. Verify if the code works properly, for example, by using Chrome browser extension Facebook Pixel Helper.
Track events on buttons
You can also enable event tracking for buttons on your landing page.
1. Add base pixel code to your landing page’s JavaScript code, as described above.
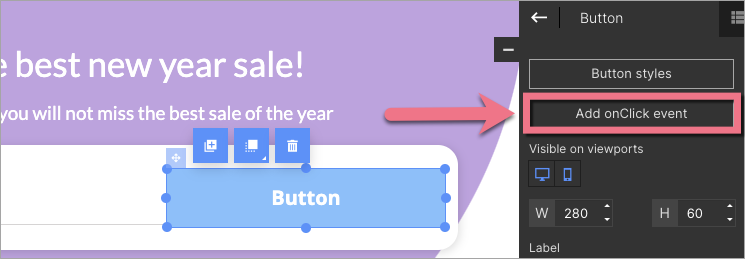
2. Go to the editor of your landing page and click the button.
3. In the right-side toolbar, click Add onClick event.
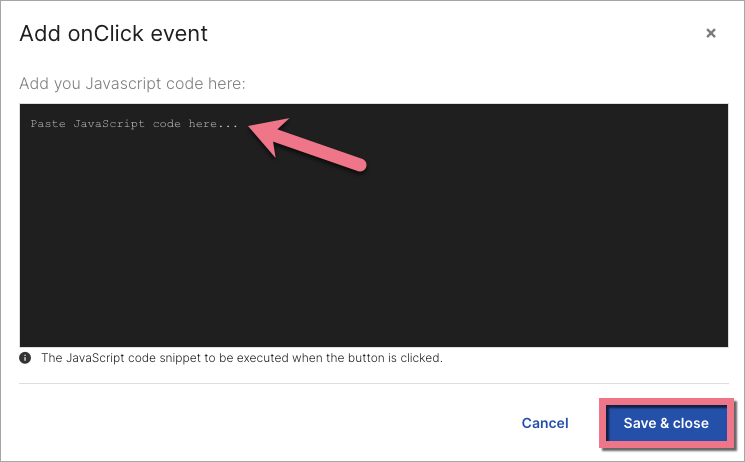
4. Paste your event snippet (e.g. from Facebook Pixel Standard Events list). Do not enter <script> and </script> tags. Then Save & close.
5. Publish your landing page.
Browse all integrations in our Integrations Catalog to see tools you can connect Landingi with.

