Product

Create, publish and optimize pages with a drag&drop, pixel perfect and mobile-friendly builder

Speed up the creation process with 400+ customizable templates for landing pages, pop-ups and sections

Track microconversions in your Dashboard and analyze events and clicks with visual map

Integrate your pages with your favorite mar-tech apps and solutions to get the flow of your campaign going

Drive sales and conversions with irresistible product displays and seamless shopping experiences

Use a reliable and secure platform that smoothly handles millions of visits

Resources

Master digital marketing with the help from savvy professionals and increase your website’s conversions

Guides for beginners, set-up instructions and creation tips to get started and optimize your pages

A free online course for landing page creators! Learn the secrets of high-converting pages and become an expert

Get the answers you’re looking for – contact us

Schedule a one-on-one meeting with us and learn more about the benefits of our platform

Home Help Center In-app Google Sheets integration

In-app Google Sheets integration

TABLE OF CONTENT

Integration with Google Sheets enables you to easily collect data from leads obtained from forms on landing pages or pop-ups, and save them directly in your Google Sheets.

IMPORTANT: Once you connect form fields with columns in a Google sheet the field attribute names will be renamed to the column names in the sheet. If you are using field attributes in an integration with another tool, keep in mind that this integration may not work when connected with Google Sheets.

Connect your form with Google Sheets

1. Log in to your Landingi account, then go to the editor.

2. Click on the form and go to its Settings.

3. In the Integrations tab, choose Google Sheets. You can use the search bar to look for the integration. Type the name and press enter.

4. Click the Connect Google Sheets button. You will be prompted to log in with your Google account. Allow the integration to access your Google account.

If you encounter an error indicating a lack of verification when attempting to connect a form to your Google account, reset Landingi’s access to your account from your Google account. This action will disconnect all active Landingi form integrations with your current Google account, and you will need to reconnect them manually.

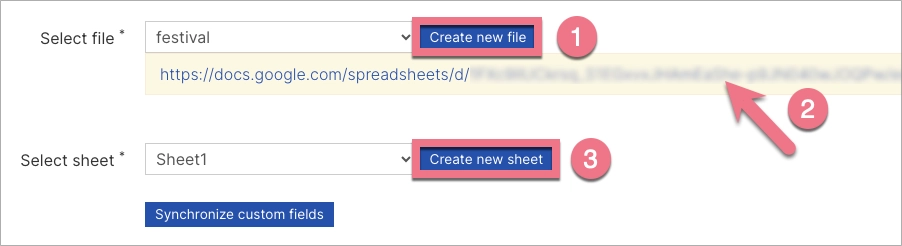
5. Create file and sheet:

(1) For the Select file field, click the Create new file button (the created file will have the same name as the landing page).

(2) Navigate to the sheet you created. Create columns for each form field.

(3) In the Select sheet field, select the sheet on which the lead data from the form should be saved or create a new sheet in the selected file by clicking the Create new sheet button. The sheet name can not consist of any special characters or numbers.

IMPORTANT: Due to new limits from Google, it is only possible to link to files created directly through the integration. This means that files created by other methods, even if they were previously linked to it, cannot be accessed by the integration.

Click Synchronize custom fields to automatically map form fields to columns in the Google sheet.

Here, you can check if you want to include in a sheet the date the lead was generated:

6. If, you have not already done so, connect fields from your form with columns in your Google sheet. Save and close.

Remember to name all the columns to which form field should be connected. Connect all columns with fields and do not leave them as “none” – then the leads will not be registered.

7. Publish your landing page and check if the data from the form is sent to your Google sheet correctly.

NOTE: Keep in mind that Google Sheets are a third-party solution and are continually being developed. We do our best to keep this guide updated, but if you come across any changes in the set-up process, let us know.

Browse all integrations in our Integrations Catalog to see tools you can connect Landingi with.