If your webpage is powered by WordPress and you want to display your landing pages on it, you can do it thanks to one of the dedicated plugins: Landingi Landing Pages, which is available in the plugin search engine in the WordPress dashboard.
The Landingi Landing Pages plugin comes in two versions depending on your PHP environment: version 4.0.0 (PHP 8.1+) and version 3.1.5 (PHP 7.4). Make sure you download the correct version for your server.

Get your API Token from Landingi
1. Access the Landingi platform and click the Settings tab in the lower left corner.

2. In the API Tokens (1) tab, click on the Add token (2) button.
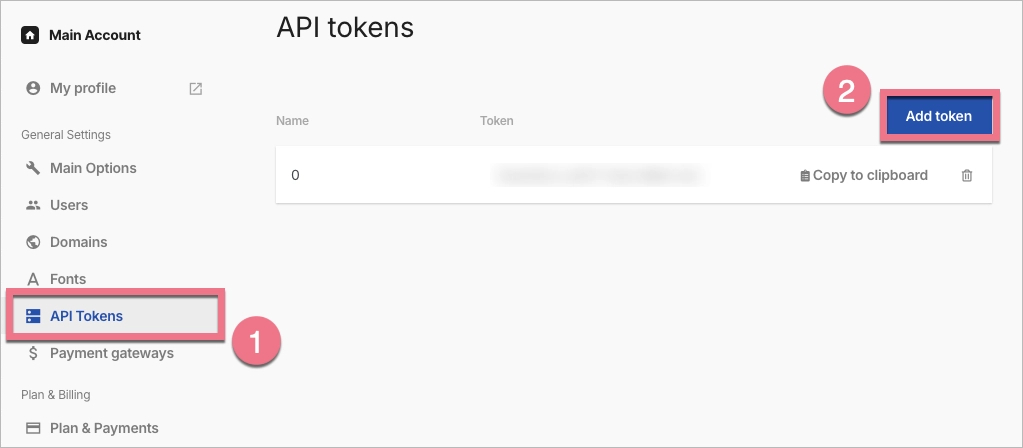
3. In the Create new API token window, type the name of your token (e.g. ‘WordPress’) and click Generate new token.

4. The generated token will be automatically saved in the API Tokens tab. Copy it.

5. Download and install our WordPress plugin.
Set up the plugin on WordPress
IMPORTANT:
- If your server runs on PHP 8.1 or newer – install plugin version 4.0.0 (WordPress will automatically notify you about the update).
- If you are using PHP 7.4 – use version 3.1.5, available in the Advanced tab.
1. Log in to your WordPress account.
2. In the sidebar on the left, click Plugins (1). Select Add new (2), search Landingi Landing Pages (3), and add it to your account.

3. Go to the Installed Plugins tab, find Landingi Landing Pages there, and click Activate.

4. In the sidebar, the Landingi tab will appear (1). Go to it and then click Settings (2). In the Setup connection window, paste the previously generated API token (3) and click Save API Token.

5. Go to the Available Landings (1) tab. On the right side, you will see the list of your landing pages made on our platform. Select the landing page that you would like to import and click Import (2). From now on, each of them will be automatically active (published).

6. In the Imported Landings (1) tab, you will see the previously imported landing pages. If you want to change the settings of any page, choose the right action that will appear after hovering over a selected landing page (2).

7. To change the URL address, hover over the selected landing page and click Edit.
The direct link will appear in a new window. Click Edit (1), change the address, and click OK (2). Save by clicking Update.

8. By default, our plugin works with a Post name option.

Remember:
- Installing the SSL certificate is on your side.
- Your landings must be published inside the platform.
- The update takes place up to several minutes after the changes are made.
- Your WordPress should be updated to the latest version and the PHP language version: 7.4 or higher.
- All you have to do is to import your landing page into the plugin only once. All changes made and published in the editor will be updated automatically on your landing page.
- If you want to use various permalink settings or path levels (e.g., landingpage.sales.com/coupon/blackfriday/…), install one more plugin: Permalink Manager Lite. This plugin allows you to set any URL address with any paths for any published pages (including imported landing pages).
- The plugin version depends on your PHP environment: 4.0.0 for PHP 8.1+, 3.1.5 for PHP 7.4. Older PHP versions do not support the latest plugin. In such cases, you need to manually download the compatible version from the Advanced tab.
To learn how to import pop-ups created in Landingi, read how to add them to your WordPress site.
Troubleshooting
If you try to publish your landing page via WordPress and you see a critical error, AND you use the Elementor plugin, proceed as follows:
1. Go to the Elementor tab and click Settings (1).
2. In Features (2) > Ongoing Experiments, select Inactive (3) in the Landing Pages section.
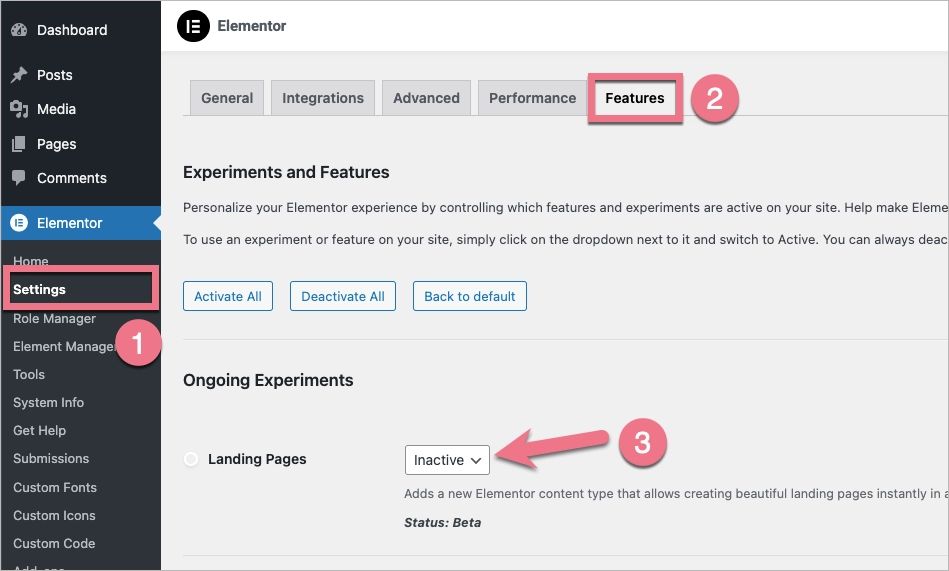
3. Save the changes. The problem should be solved.

