In this guide, you will learn the basics of the image widget in the editor: how to adjust the image look, size, and position, set redirections, or on-click actions. In your gallery, you can organize images with folders, subfolders, and tags.
Add image
On the left side of the editor, find the Image widget, then drag and drop it into the active area of your landing page.

After adding an image, a settings window will open automatically. You can also enter the settings by double-clicking on the widget area.
Image settings
There are two tabs in the image settings. Remember to save the changes you make.
My images gallery
1. Add your images. Click Upload (1) or drag files directly from your computer and drop them into the gallery (2). After uploading, images will be displayed in the gallery.

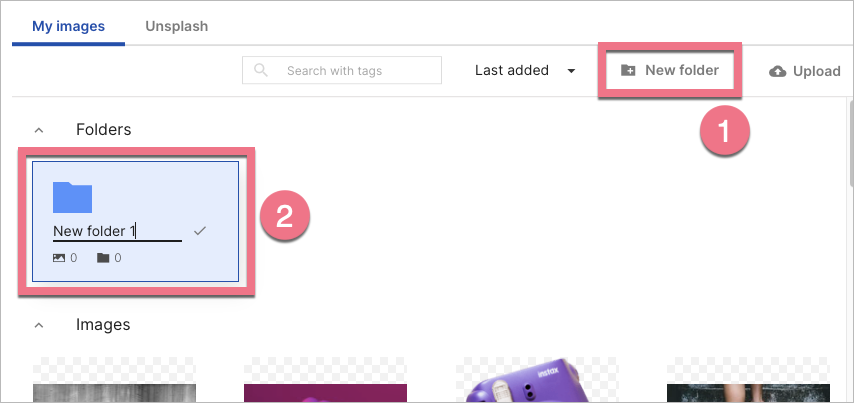
2. Images in this gallery can be organized in folders. Click New folder (1) to create a new one, then name it and save (2). Below the folder name, you can find the number of images and subfolders in this folder.
- You can create subfolders in subfolders.
- You can add up to 1000 images/subfolders in every folder and subfolder.
You can search for folders/subfolders by their names – on the folder level, you are currently on.

To add a new image to a folder, click Upload or drag and drop your files. You can also move your images from gallery/folder to another folder – select files (1), click Move (2), and choose the target folder.

To move just one image, click the icon:

3. In the gallery, you can quickly access an image editor. Click the three dots icon – you will see two options: Edit image and Remove background.

The Edit image option opens a new window, where you can rotate, crop, or gray-scale the image.

The Remove background option automatically removes the background from your image.

4. Tags allow you to categorize your images and search them. To add them, select an image (1), click Tags (2), and enter keywords that describe the file (3). Do not forget to Save.

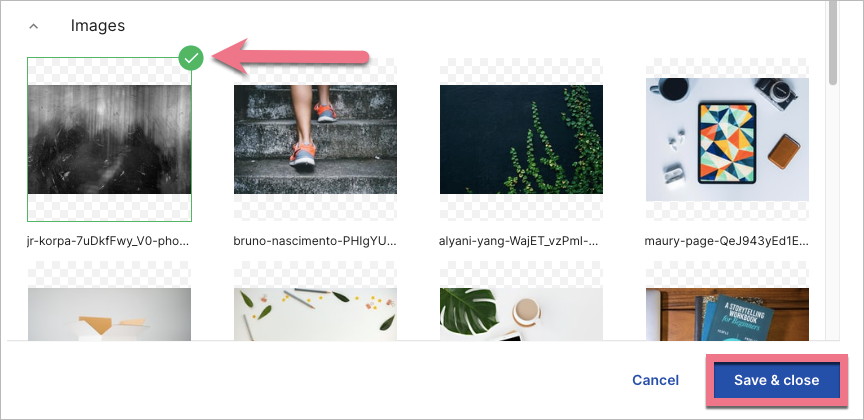
5. To add an image to your landing page, double-click on a selected image or click once and Save & close.
Unsplash
Enter the Unsplash tab.
Unsplash is a platform with free, high-definition images. It’s completely free to download, use, copy, or modify the images. You can use the images for all of your projects, both commercial and non-commercial ones. You can browse Unsplash images and add them to your landing pages, pop-ups, or lightboxes in our landing page builder.
Learn more about Unsplash free images gallery here.

Edit image
Click on the widget to start editing. You will see its context menu (1) and a toolbar on the right side of the editor (2).

Context menu
You can change the size of the image by clicking on the dots on the frame (1). The remaining icons let you change the image’s position (2), enter the settings and change the image (3), duplicate it (4), move it to the top/bottom (5), and delete the image (6).

Widget toolbar
In the widget toolbar, you can go to a gallery, edit the image, turn on/off mobile or desktop view (by default, the image is visible in both views), and change the image size.
Underneath, you will find tabs with some additional options. Some of them can be turned on or off using the slider located in the right-hand corner.
- Click Action – select actions after clicking on the image: link to URL, scroll to section, show lightbox, image gallery.
- Image SEO – give a title to the image and place an alternative text visible when the image cannot be loaded.
- Border – adjust the parameters of the frame: thickness, line style, and color.
- Rounded corners – set specific values to round corners (the value can be the same for all corners or different for each).
- Shadow – set values for the shadow of the image.
- Other – adjust image position, copy the button ID or add a class.

Image optimization, recommended sizes, and formats
Each image is automatically optimized while publishing your landing page so that it will load quickly.
To make the landing page editing using graphic files run smoothly, it is worth remembering their properties:
- Graphics as a background of landing pages: recommended width is 1920 px (remember that the most important background elements should be placed within 1200 px width).
- Graphic files (image widgets): 1:1 size (the same as it should be displayed on the screen).
- Format: for the pictures, there are .jpg and .png; the icons can be added in .svg format.
Learn more about best practices on landing page images.

