To ace your landing page, pop-up, or lightbox, you should take care of the images – their quality, as well as size, format, and adjustment to browsers.
If you are looking for high-quality photos, use the Unsplash free stock images and find your images directly in the editor.
You can browse the image widget category in our Help Center.
REMEMBER: This article shows tips and best practices, you can always manage the images your own way.
Recommended images on a landing page
Dimensions and resolution
Recommended dimensions:
- Favicon: 192×192 px
- Landing page/section background image: width 1920 px, height – depending on your needs (maximum of 860 px is recommended to fit the whole section in one view)
- Section background image with parallax: width 1920 px, height 1080 px
- Logo: logos vary, but remember to keep them small (especially in the hero section), e.g. 150×50 px
Other graphics and images should be added to the editor in their display dimensions.
Recommended resolution:
Most computer screens’ resolution is 72dpi or 90dpi, thus there is no need to export bigger files from your graphic program.
Our editor lets you upload files not bigger than 8000×8000 px and 25MB.
Formats
Recommended formats:
- Icons: ideally .svg, if impossible, use .png
- Other images: .png, .webp, .avif, or .jpg
Images optimization
Proper dimensions, resolution, and format are important, but you should also take care of additional optimization of the images. That way, the page loading will be faster, which in turn will improve rankings and user experience.
Cover these three aspects to optimize images for the web:
- Design & appearance
- Fast loading
- Indexing by search engines
What you can do:
- Use high-quality images, then resize them and save them in the right format.
- Save images in mid-quality, e.g., 60-70% (it does not apply to photos in your portfolio). Do not export graphics in high resolutions – be concerned mostly about pixels, not dpi value.
- Reduce the size of images with a compression tool, e.g., TinyPNG (smaller graphics should not be bigger than 200 KB).
- Give your images SEO-friendly names.
IMPORTANT: Each landing page created in Landingi is optimized for fast loading. Therefore, make sure the image size closely matches the desired size for the published landing page. Doing so will minimize the need for extensive optimization and will maintain the quality of the image.
WebP is a format that can be animated like a gif and is not affected by optimization. If you want to preserve an image without reduction, you can use it as a WebP, but be aware that this may slow down the page loading speed.
Images compression
Each image loaded to the Builder and added to the page is compressed for optimal page performance. If you’re working with non-standard images, the image displayed is blurred or doesn’t display properly, try turning off the compression.
NOTE: Turning off the compression may affect the page performance and image loading times.

Images editing options in the Builder
Images in the Landingi editor can be refined in several ways. Below, you will find a list of options that may help you create your graphics more efficiently.
Editing options in a toolbar
Click the Image widget and navigate to the right-side toolbar.
You will find three editing tabs: (1) Borders, (2) Rounded corners, (3) Shadow.

After entering the widget, you will see the gallery, from where you can navigate to additional options: Edit photo and Remove background. Learn more about the Uploadcare editing tool.

Image editing with other widgets
Other widgets may be a great way to create more complex graphics directly in the editor.
Create a filter effect on your image with the Shapes widget
1. In the editor, find the Shapes widget. Select a shape, then drag and drop it into the active area of your landing page.

2. Adjust the size and position. Navigate to the right-side toolbar and activate the Background (1) tab. Click the Color field and then choose your color and change its transparency (2).

You can also adjust the borders, corners, and shadow of the Shape.
Gradient overlay under the text
Adding a gradient overlay to an image will make the text on the image more readable.

1. Click the image on which you want to add a gradient overlay. From the right-side panel, copy the image’s width.

2. Add the Shape widget. Adjust its size and position. Set its width (1) to the same as the image’s one. Unfold the Background tab and select Gradient (2) as the style.

3. Click a color field (1) and then lower its transparency (2).

4. Add your text. Ensure it is placed over your image and gradient shape: click the text, choose Change layer, and then click Move to top.

Shapes with parallax effect
You can also combine the Shapes widget with the parallax effect to create visually interesting effects that will effectively attract the attention of landing page visitors.
1. Add a Shape and select Image as the background style.
2. Add an image of your choice and select Parallax Effect. Customize the settings.
Play the video below to see the parallax effect with Shape:
Other tips
Multiple small graphics in the same size
While creating multiple small shapes/images, you need them to be exactly the same. To do so, create one element, go to the mobile view, and adjust it there.
Go back to the desktop view and copy the element as many times as you need. That way, you do not have to repeat the editing multiple times and each graphic will be equal, also on a mobile view.
Gradient image in the section background
If you want to add a gradient filter to your section background image, add the image to the landing page background and then choose Gradient as a background style for the section.

Links and sizes of images uploaded to a landing page
If you need a size or a link of the original image already uploaded to your landing page (for example, for creating sliders), you can find them on a published landing page.
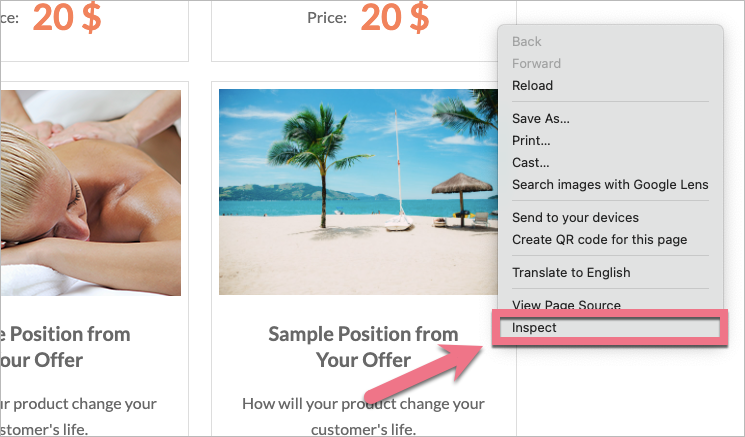
1. Go to your published landing page and right-click next to the image. Select Inspect.
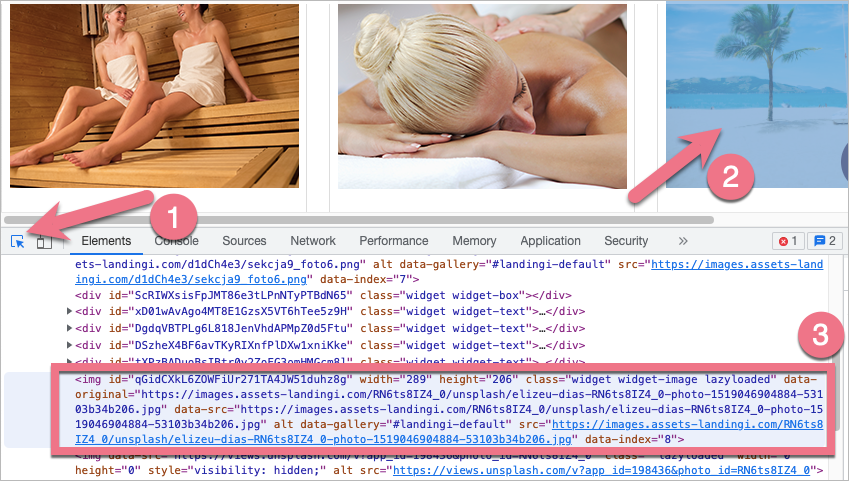
2. An HTML code window will open. Click on the select tool (1) and hover over your image (2). The part of the code relevant to the image will be highlighted (3).
3. Hover over the src link (1). In a pop-up window (2), you will find the original image’s size (intrinsic size), link (current source), and other information.
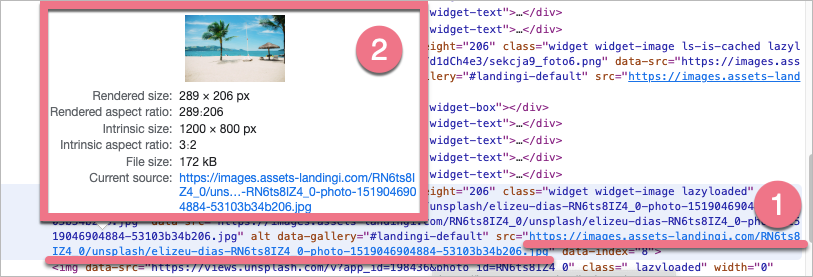
This method works both for regular images and for images uploaded to a gallery.

