If you want your landing pages to appear under your main domain instead of a subdomain, you can use a reverse proxy.
By default, when you publish a landing page in Landingi, it’s available under a subdomain, for example: https://offers.website.com/offer-lp
But you may prefer visitors to see the page directly under your main website, such as: https://website.com/offers/offer-lp
This is where a reverse proxy comes in. It works as an intermediary: when someone visits a chosen address on your domain, the reverse proxy fetches the landing page from your Landingi subdomain and shows it as if it were hosted directly on your website.
Reverse proxy publishing is an alternative to PHP Embed or the WordPress plugin.
Use this option if:
- you already have a website hosted under your main domain,
- you cannot or don’t want to redirect that domain to Landingi,
- but you still want to display landing pages within the structure of your existing website.
NOTE: To set up the reverse proxy redirect, you will need to contact your server’s administrator.
How does the reverse proxy work?
- You publish a landing page in Landingi under a subdomain, e.g. https://offers.website.com/ebook-download.
- A visitor goes to your main domain, e.g. https://website.com/offers/ebook-download.
- The reverse proxy server fetches the content from the subdomain and delivers it under your main domain.
The visitor won’t notice the difference – the page looks like it lives directly on your main website.
This approach is useful if you want to:
- keep all landing pages under your main domain for branding consistency and SEO benefits,
- simplify URLs for visitors,
- or avoid managing multiple subdomains.
Here’s how to do it in Landingi:
Step 1: Decide how to display your landing pages
Before configuring the reverse proxy, think about how you want landing pages to appear under your main domain.
There are two ways to map the target URL to the source URL:
1. Single pages mapping:
- Map https://website.com/offers/offer1 with https://offers.website.com/offer1,
- Map https://website.com/offers/offer2 with https://offers.website.com/offer2, etc.
2. Entire folder mapping (recommended):
- Map https://website.com/folder/* with https://folder.website.com/*
- Any new landing page you publish under the subdomain will automatically appear under your main domain.
- This is the recommended option, as it allows you to create new landing pages in the future without making any additional changes on your server.
Step 2: Create and publish your landing page
1. Set up a subdomain that points to Landingi (for example: offers.website.com).
2. Build your landing page in Landingi.
3. Publish your landing page under that subdomain (e.g. https://offers.website.com/offer-lp).
Step 3: Configure the reverse proxy on your server
This step must be completed by your server administrator or hosting provider.
Below are example configurations for Apache2 and Nginx (for guidance only). Your administrator should adapt them to your environment for security and performance reasons.
Example configuration (for reference only)
Do not copy these directly – your administrator must adjust them to your environment.
Apache2
<VirtualHost *:443>
    ServerName website.com

    SSLEngine On
    SSLCertificateFile /path/to/your/certificate.crt
    SSLCertificateKeyFile /path/to/your/private.key
    SSLCertificateChainFile /path/to/your/chain.crt

    ProxyPreserveHost On
    ProxyPass /offers/ https://offers.website.com/
    ProxyPassReverse /offers/ https://offers.website.com/
</VirtualHost>
Nginx
server {
    listen 443 ssl;
    server_name website.com;

    ssl_certificate /path/to/your/certificate.crt;
    ssl_certificate_key /path/to/your/private.key;

    location /offers/ {
        proxy_pass https://offers.website.com/;
        proxy_set_header Host $host;
        proxy_set_header X-Real-IP $remote_addr;
        proxy_set_header X-Forwarded-For $proxy_add_x_forwarded_for;
        proxy_set_header X-Forwarded-Proto $scheme;
    }
}
Step 4: Adjust buttons and forms (for folder mapping)
If you use folder mapping, add a small JavaScript snippet to make sure buttons and forms work properly:
1. Log in to your Landingi account and navigate to the Dashboard of your landing page.
2. Go to the JavaScript Code tab and click Add new script.
You can also access the JavaScript Code tab directly from the editor:

3. Paste the snippet indicated below and replace the baseFolder variable with the correct folder path.
<script>
  $(document).ready(function() {
    var baseFolder = '/offers';

    $('.widget-button').each(function() {
      var wrongURL = $(this).attr('href');
      if (wrongURL && wrongURL.includes('button')) {
        var goodURL = baseFolder + wrongURL;
        $(this).attr('href', goodURL);
      }
    });

    $('form').each(function() {
      $(this).attr('method', 'post');
      var wrongURL = $(this).attr('action');
      if (wrongURL && wrongURL.includes('submit')) {
        var goodURL = baseFolder + wrongURL;
        $(this).attr('action', goodURL);
      }
    });
  });
</script>
Example: If your landing pages are mapped under /offers, keep baseFolder = ‘/offers’. If you mapped them under another folder, like /promotions, update it to baseFolder = ‘/promotions’.
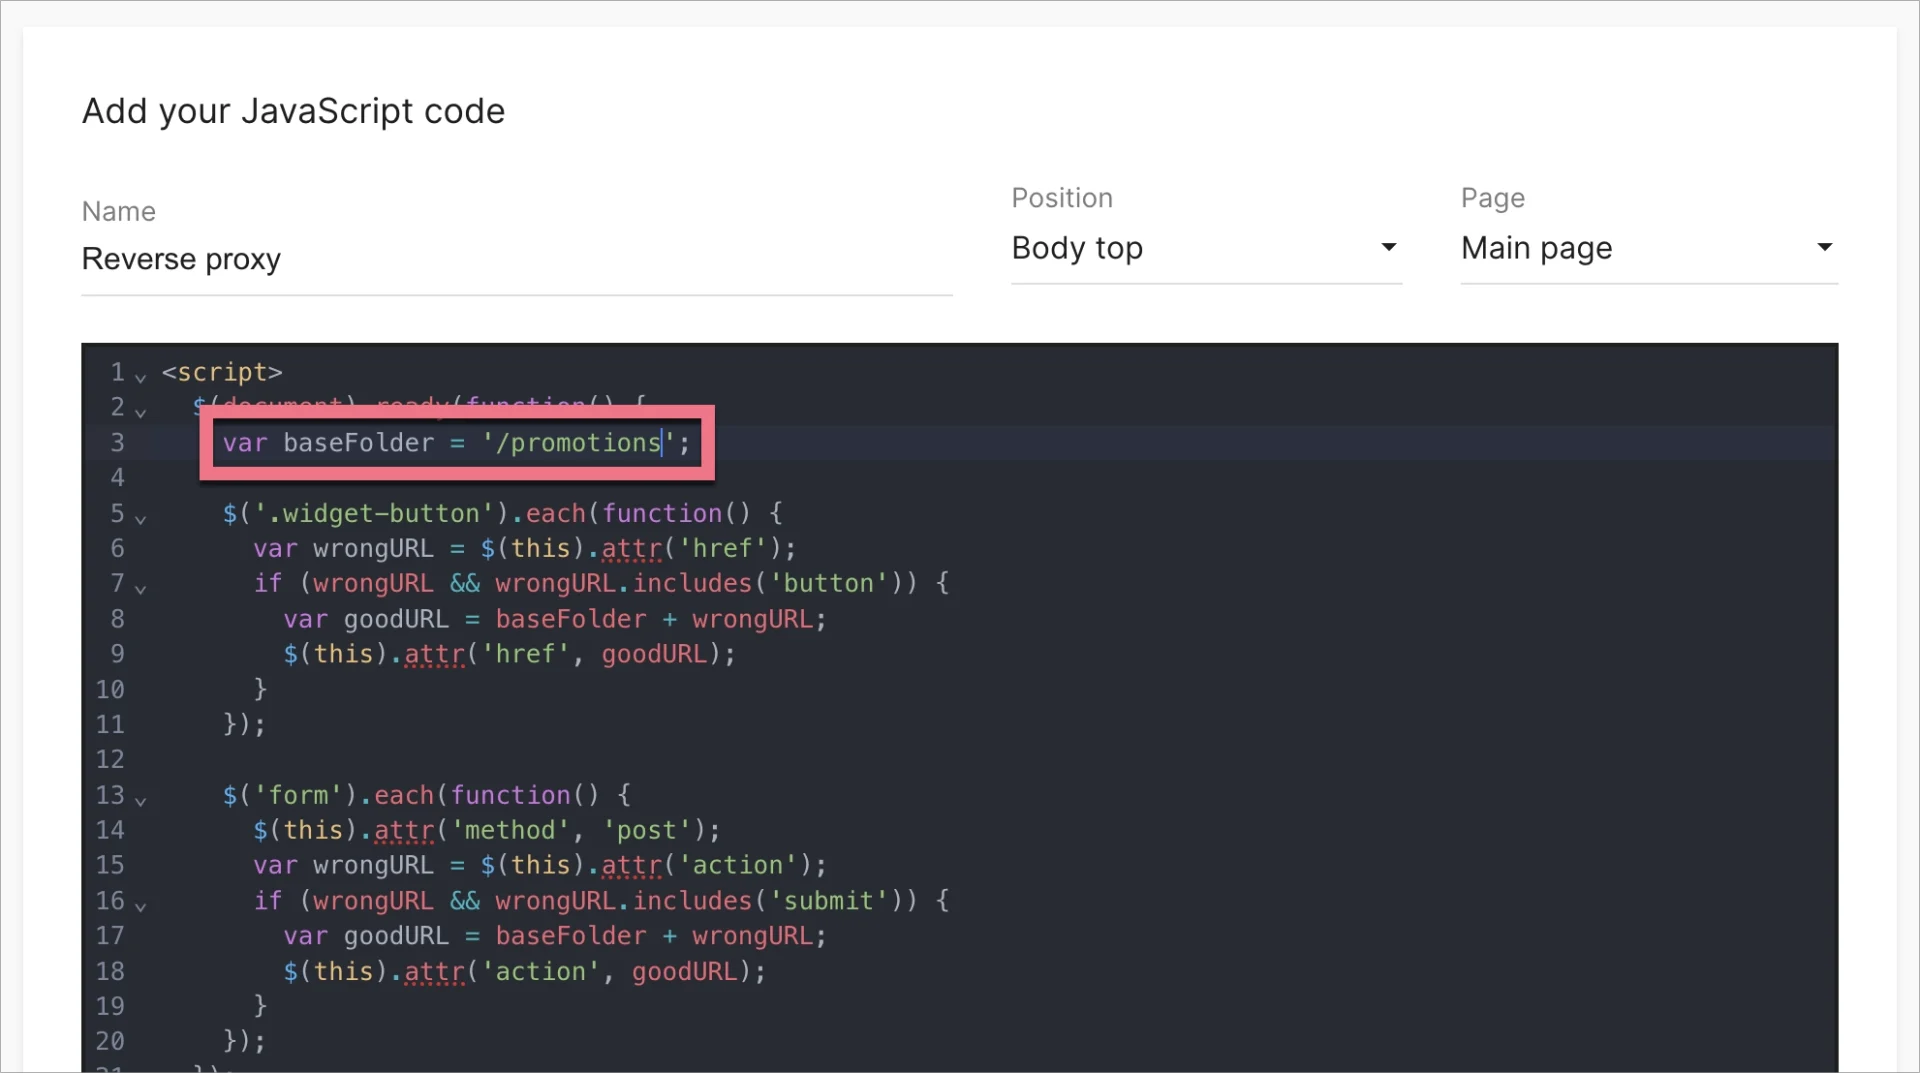
4. Name the script, select the Body top position and Main page, then save.
That’s it! Your landing pages should now display under your chosen folder or directory on the main domain.
If you have any issues, contact us at support@landingi.com. We’ll be happy to help.

