Funnel is a set of steps visitors take to become your customers. Leaving data in such a journey seems much more unforced for them. Thus, creating a funnel is the simplest way to attract users, convince them to become leads, and make them purchase your product.
In Landingi, you can create a funnel simply by connecting two or more landing pages.
TIP: At the end of the funnel, consider creating a thank you page with a referral link to track a landing page referral process by those who filled out a form.
Types of funnels
Firstly, decide what type of funnel you need.
- Marketing funnel – an expert strategy that involves various marketing tactics depending on where the user is in their buyer’s journey.
- Conversion funnel – extremely focused on personalization and perfecting customer purchasing journey basing on customer feedback.
- Sales funnel – a prolongation of a marketing funnel impacting whether you make a profit or not. The sales funnel allows you to slightly push your visitors to purchase from you.
Want to know more details about marketing and sales funnels? Read about their differences.
Funnel after form submission
1. Go to the editor of your landing page in Landingi.
2. Click on the form and go to its Settings.

3. In the Next action tab, decide where the user will be redirected when the form is filled in. Choose Redirect to another landing page and select the landing page (1).
If you want to connect several landing pages, you can choose whether you want to move the data from the current landing page to the next one. If so, enable the Transfer lead data option (2). You can also choose to open the target landing page in a new tab (3).

4. Save and close.
Funnel through the button widget
1. In the editor, click on the button. In the right-side toolbar, find the Click Action tab and unfold the Action menu.

2. Select Redirect to a landing page and choose your Target Landing Page.
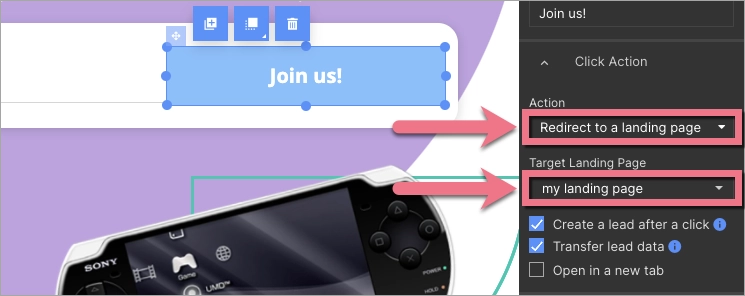
3. The Create a lead after a click option allows you to count clicks as conversions in your landing page Dashboard.
4. Publish the landing page.
Funnel with third-party integration
In Landingi, you can connect two or more landing pages in a funnel, transfer lead data from one landing page to another, and at the same time integrate the form with the third-party tool.
If you want to make a funnel, integrate with an external tool (e.g., with MailChimp or Campaign Monitor), and expect all data from every step to be sent to it, remember that the general rule is connecting the form with your integration only on the last element of the funnel. Make sure that the Transfer Lead Data is checked when you redirect a landing page to another one.
Imagine you have two landing pages in your funnel. Let’s call them LP1 and LP2.
LP1 has two fields – Name and Email. After submitting the form, your user is redirected to LP2 with only one field – Phone.
Let’s say you want to send all lead data from LP1 and LP2 to MailChimp. In this case, you need to set form integration with MailChimp only on the last landing page of the funnel (here – LP2).

1. Log in to the platform. Go to the Landing Pages tab and go to the editor of LP1 (here – with Name and Email fields).
2. Click on your form and go to its Settings.
3a. In the Form fields tab, click on the fields which data you want to be transferred to another landing page. Unfold the Show name attribute option and copy the value of the name attribute of every field.

3b. In the Integration tab, select None.

3c. Go to the Next action tab, choose Redirect to another landing page and select your LP2. Make sure that Transfer lead data is enabled.

4. Click Save and close and publish LP1.
5. Go to the Landing Pages tab again and go to the editor of LP2 (here – with Phone field).
6a. Go to the Form Settings and in the Form fields tab, click Add element (1). Add hidden fields (2) to the form (as many as there are on the LP1).

6b. For every hidden field, leave the value field empty (1). Click Show name attribute and paste (2) the value copied from LP1, e.g. name or email.

7. Go to the Integrations tab and choose your integration. Customize it.
8. Click Save and close and publish your LP2.
Test all forms in the funnel and check if the leads are successfully sent to your integration.
If your sales funnel conversion rate is not satisfactory, check our article about how to increase it.

