With Google Tag Manager (GTM), you can easily manage all tags added to your website. Tag Manager gives you the ability to add and update your own tags with no coding knowledge or web developer interference.
This guide will walk you through our in-app Google Tag Manager integration, which allows you to manage the tag globally. After integrating GTM with Landingi, the tag applies to all your landing pages.
- You can also connect GTM and your landing pages manually.
Get your Container ID
1. Log in to Google Tag Manager.
2. Choose the account you want to connect Landingi with.
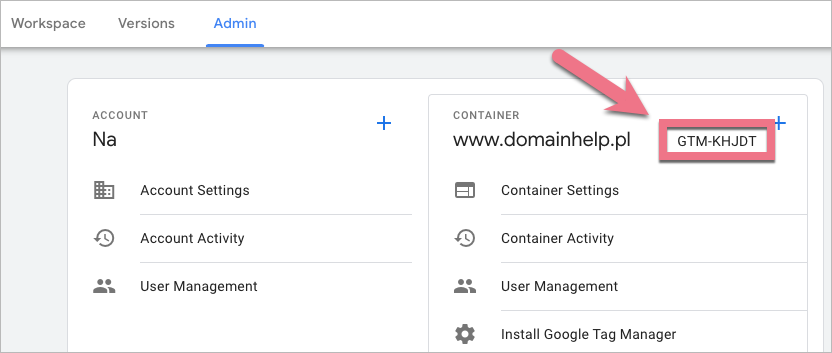
3. Copy the Container ID. You can find it in three places:
- on an accounts list

- on a Workspace view

- on an Admin view
Install the Container ID in Landingi
1. Log in to your Landingi account.
2. Navigate to the Settings tab located in the lower left corner.

3. Go to the Main Options tab and find the Google Tag Manager section.

4. Paste your Container ID (1).
You have the option to select GTM script loading delay (2) – learn more about GTM script delaying in the next section of this guide.
Click Save changes (3).

5. The tag will be installed on all new landing pages automatically. To add the tag to current pages, republish them.
The tag will start working within a few hours.
Delay GTM script loading
Google Tag Manager is a powerful tool for managing various tracking codes and scripts on your website, however loading these scripts too early can negatively impact page speed and user interactions.
Enabling GTM script loading delay will make GTM start only after the visitor performs some action in the page window (e.g. moving the cursor, clicking) or after 3.5 seconds.
Why it is worth delaying GTM script loading?
This can increase landing page load times, which provides a better user experience. A delay in loading GTM scripts can also contribute to a reduction in render-blocking behavior, resulting in quicker content accessibility and interaction. Additionally, delaying GTM script loading allows you to have more control over when and how scripts are executed on your website.
Why it is not worth delaying GTM script loading?
Delaying the loading of Google Tag Manager (GTM) may result in losing pageviews and other data when users navigate off a page before the GTM script is fully loaded and executed. Additionally, delaying script loading might affect the execution and functionality of custom scripts or tags implemented through GTM.
Whether or not it is advantageous to postpone the loading of your GTM script on your landing page is your decision.
Doubled events troubleshooting
If you see two _event variables with the value of form_submit in your GTM (Tag Asisstant) preview, it could result in incorrect statistics. To fix this, add JavaScript code to a thank you page.
IMPORTANT: This fix only works for a default thank you page.
1. Go to your landing page Dashboard > JavaScript Code tab, and add new code.

2. Copy the script:
<script>
dataLayer.push({'event': 'event_name'});
</script>
Modify the event_name as per your preference, and it will show up as the event value in the GTM preview after submitting the form.
3. Name (1) the new code, choose Body bottom (2) position, and Thank you page (3). Paste the script in the content field (4).
Click Add script to save the changes.

Check if everything works properly in GTM.
Browse all integrations in our Integrations Catalog to see tools you can connect Landingi with.

