


An MCP (Model Context Protocol) server connects an AI tool to an external platform, allowing you to perform tasks through a conversation. With Landingi’s MCP server, called Orbit, you can create, edit, publish, and analyze landing pages directly from your AI chat (LLM).
With the Landingi MCP server connected to your AI chat, you can describe a landing page task in plain language. AI can use your brief, images, and brand guidelines to carry out that task in Landingi. This helps you build campaign pages, duplicate them for new offers, and check results without manually transferring information between tools.
This guide explains how to connect the Landingi MCP server to an LLM, like ChatGPT, and start using it.
What can you do with the Landingi MCP server?
After connecting the Landingi MCP server to your AI tool, you can use natural-language prompts to perform the following tasks in Landingi:
- Generate landing pages from campaign descriptions, briefs, and attached materials.
- Edit existing Lunar pages by updating their copy, layout, and elements.
- Publish and unpublish landing pages.
- Duplicate landing pages for new campaigns, offers, or audiences.
- Assign domains and URL paths to selected pages.
- Check performance, including visits, conversions, and conversion rates.
- Search, filter, and rename landing pages.
- View available accounts and subaccounts and specify where a task should be performed.
- Manage your image gallery by uploading images, reusing existing assets, and organizing them into folders.
- Apply brand guidelines from a brand book, DESIGN.md file, or instructions shared in the chat.
- Create pages with forms and CTA buttons.
- View and restore previous versions of Lunar pages.
Describe the task in plain language, specifying the page, account, and expected result.
How to connect the Landingi MCP server to AI (ChatGPT example)
Make sure you have access to a Landingi account and an AI environment that supports MCP connections. The steps below show how to connect the Landingi MCP server using ChatGPT as an example. You can connect the Landingi MCP server to other AI tools, such as Gemini, Claude, or Perplexity, in a similar way, depending on their MCP support and connection settings.
The Landingi MCP server is available on all Landingi plans. Access to individual features depends on the capabilities and permissions of the connected account.
NOTE: Creating and editing pages through the Landingi MCP server does not consume Landingi credits. Your connected AI tool generates the page and its updates, then sends them to Landingi. Usage limits or charges from your AI provider may apply.
Documentation for the Orbit Landingi MCP server is available at: https://mcp.landingi.com/docs.
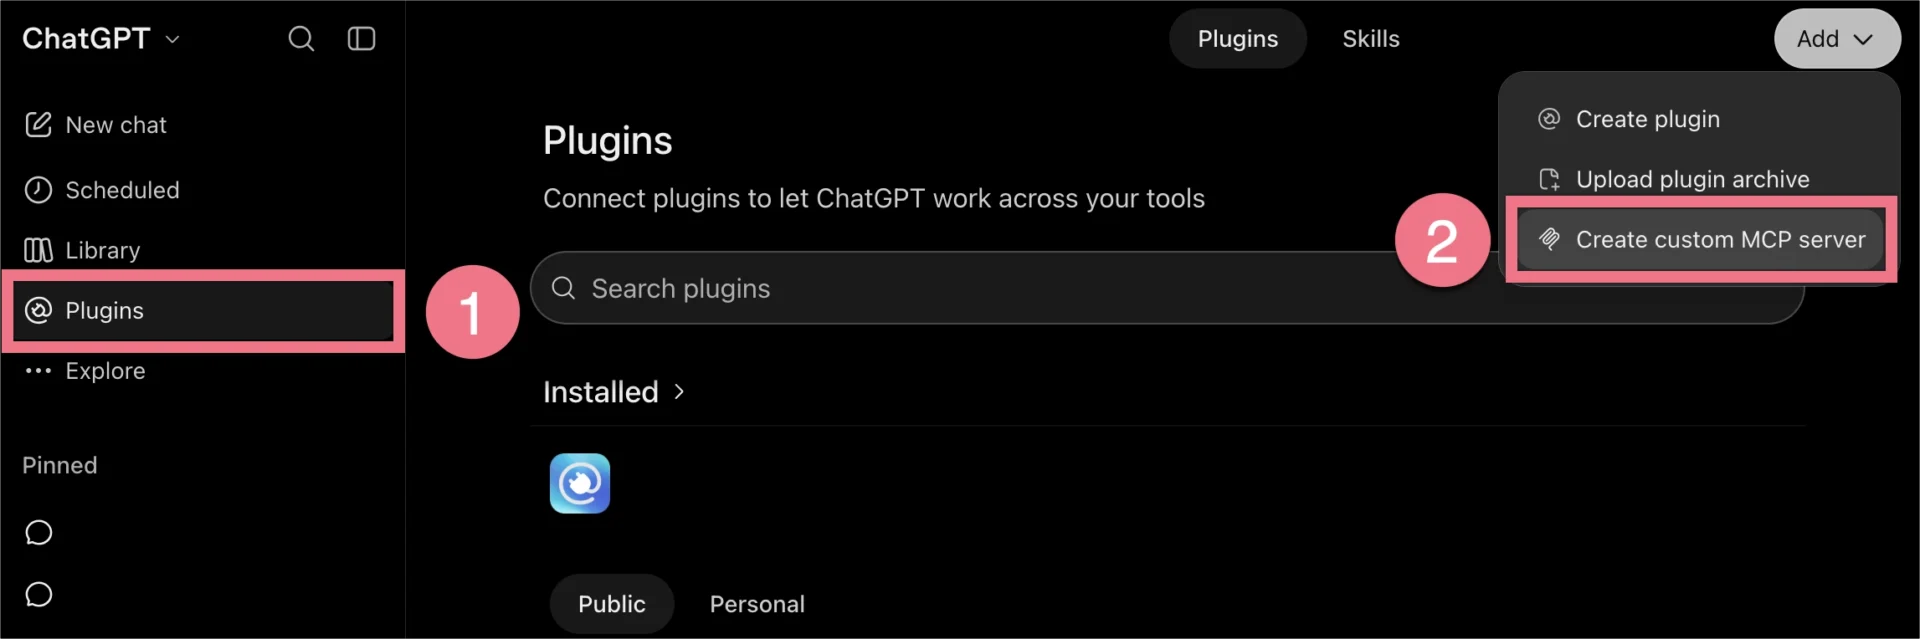
1. To add an MCP connection in ChatGPT, open the Plugins (1) tab in the left sidebar. Click Add and select Create custom MCP server (2).
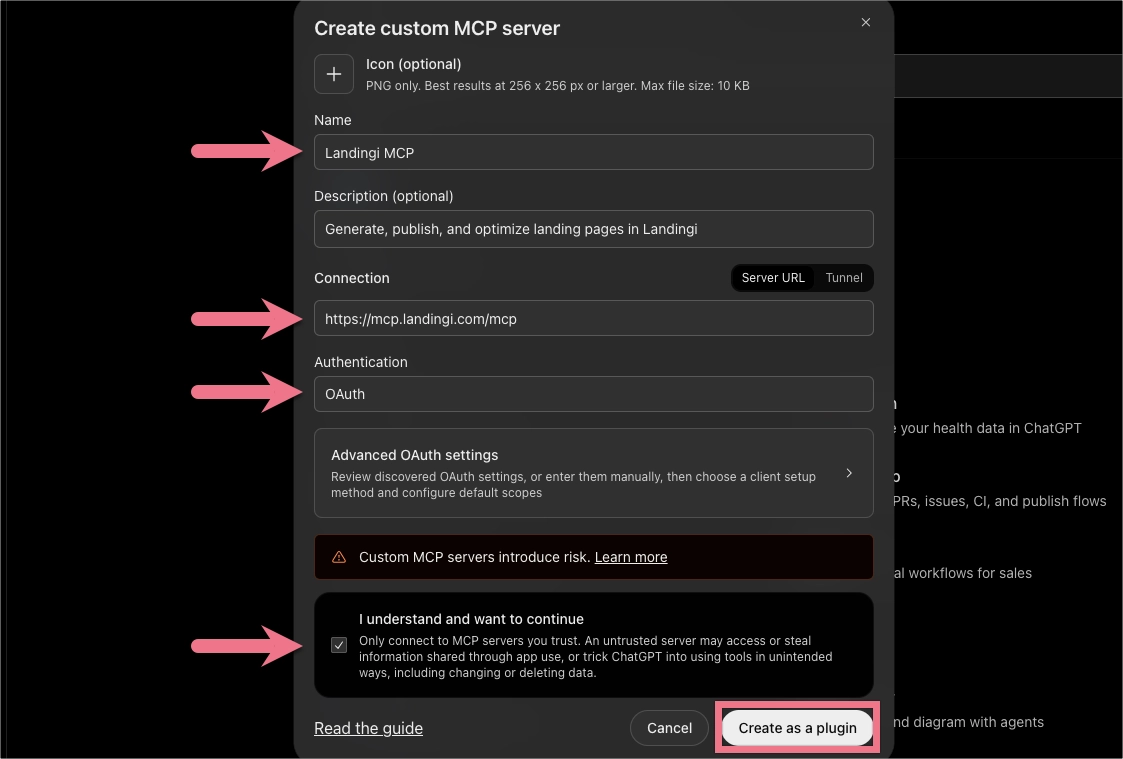
2. Enter the server settings. In the new window, complete the following fields:
- Name: Landingi MCP
- Description: Optional. For example, “Create, publish, and optimize landing pages in Landingi”
- Connection: Select Server URL and enter
https://mcp.landingi.com/mcp - Authentication: Select OAuth
Review the connection notice. Select I understand and want to continue, then click Create as a plugin.
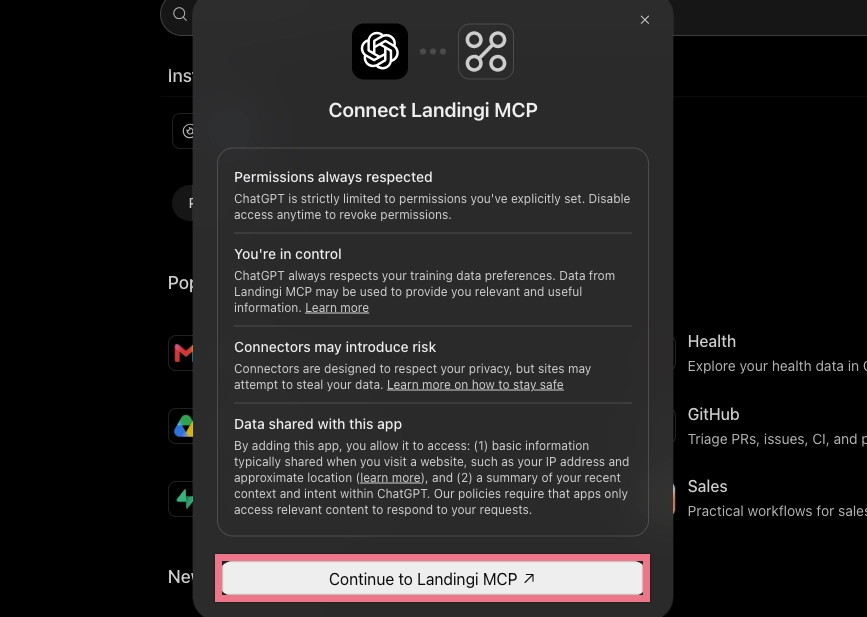
3. Continue to Landingi. In the Connect Landingi MCP window, click Continue to Landingi MCP. You’ll be redirected to Landingi. If you’re not already signed in, log in to your account.
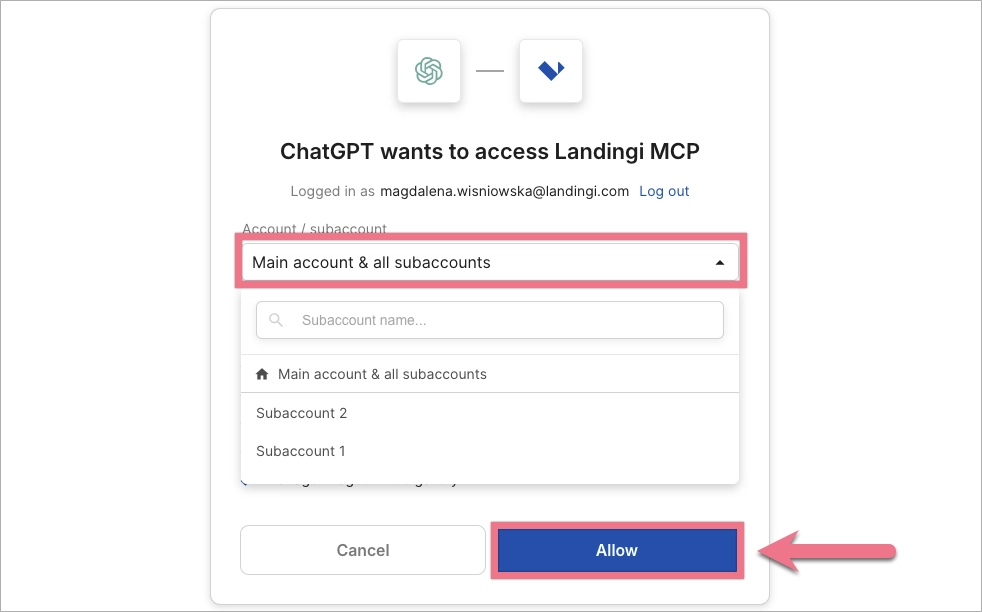
4. Select an account and authorize access. In the new window, in the Account / subaccount field, select the connection scope:
- Main account & all subaccounts – connect your main account and all subaccounts.
- A specific subaccount – select an individual subaccount from the list.
Click Allow to authorize the connection.
Once authorization is complete, you can use Landingi MCP in your chat.
TIP: If you work across multiple accounts, include the account or subaccount name in your prompt. This tells AI where to perform the task.
How to use Landingi MCP in ChatGPT
After connecting the Landingi MCP server, you can select it in your AI chat and start requesting landing page tasks.
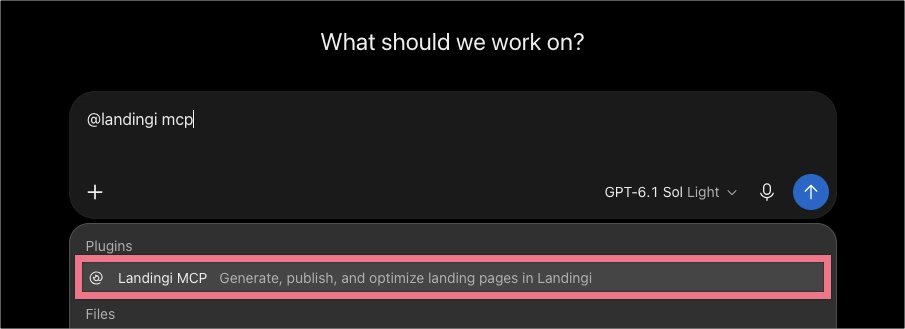
1. To select Landingi MCP, open a conversation in ChatGPT. In the message field, type @, start typing Landingi MCP, and select the plugin from the list.
2. Enter your prompt and send the message. You can attach product photos, a brief, or instructions for the page design.
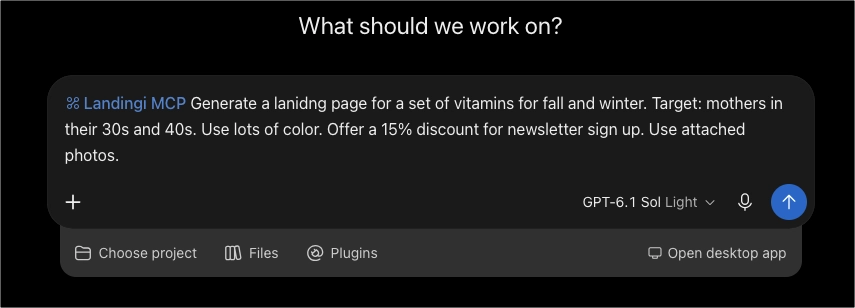
TIP: When creating a page, include the campaign goal, audience, offer, language, visual style, and desired visitor action. When editing a page, provide its name or ID and describe the specific changes.
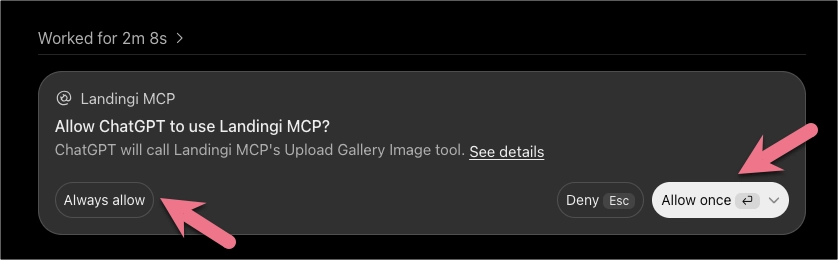
ChatGPT may display Allow ChatGPT to use Landingi MCP? along with details about the planned operation.
Choose:
- Allow once – approve a single use of the tool.
- Always allow – save your approval for the specified tool.
3. After completing the task, AI will display a response. The generated page will appear in your landing page list in Landingi.
You can continue in the same conversation. For example, ask AI to update the headline, add a section, or create a copy of the page.
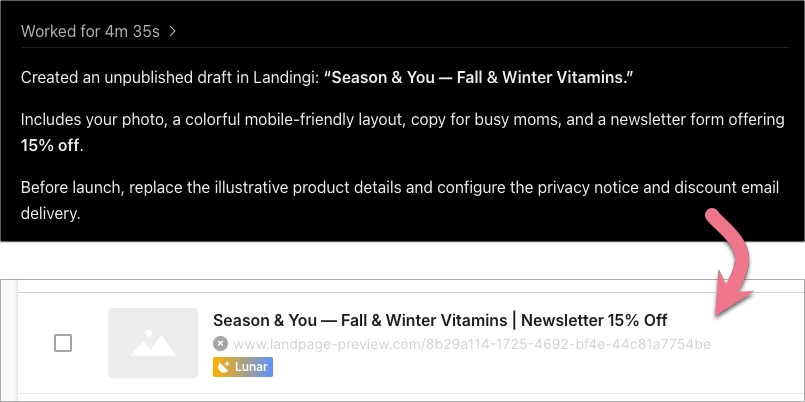
IMPORTANT: Creating a page does not automatically publish it. Specify whether you want to save a draft or publish the landing page. Before publishing, review the content, form, and page URL.
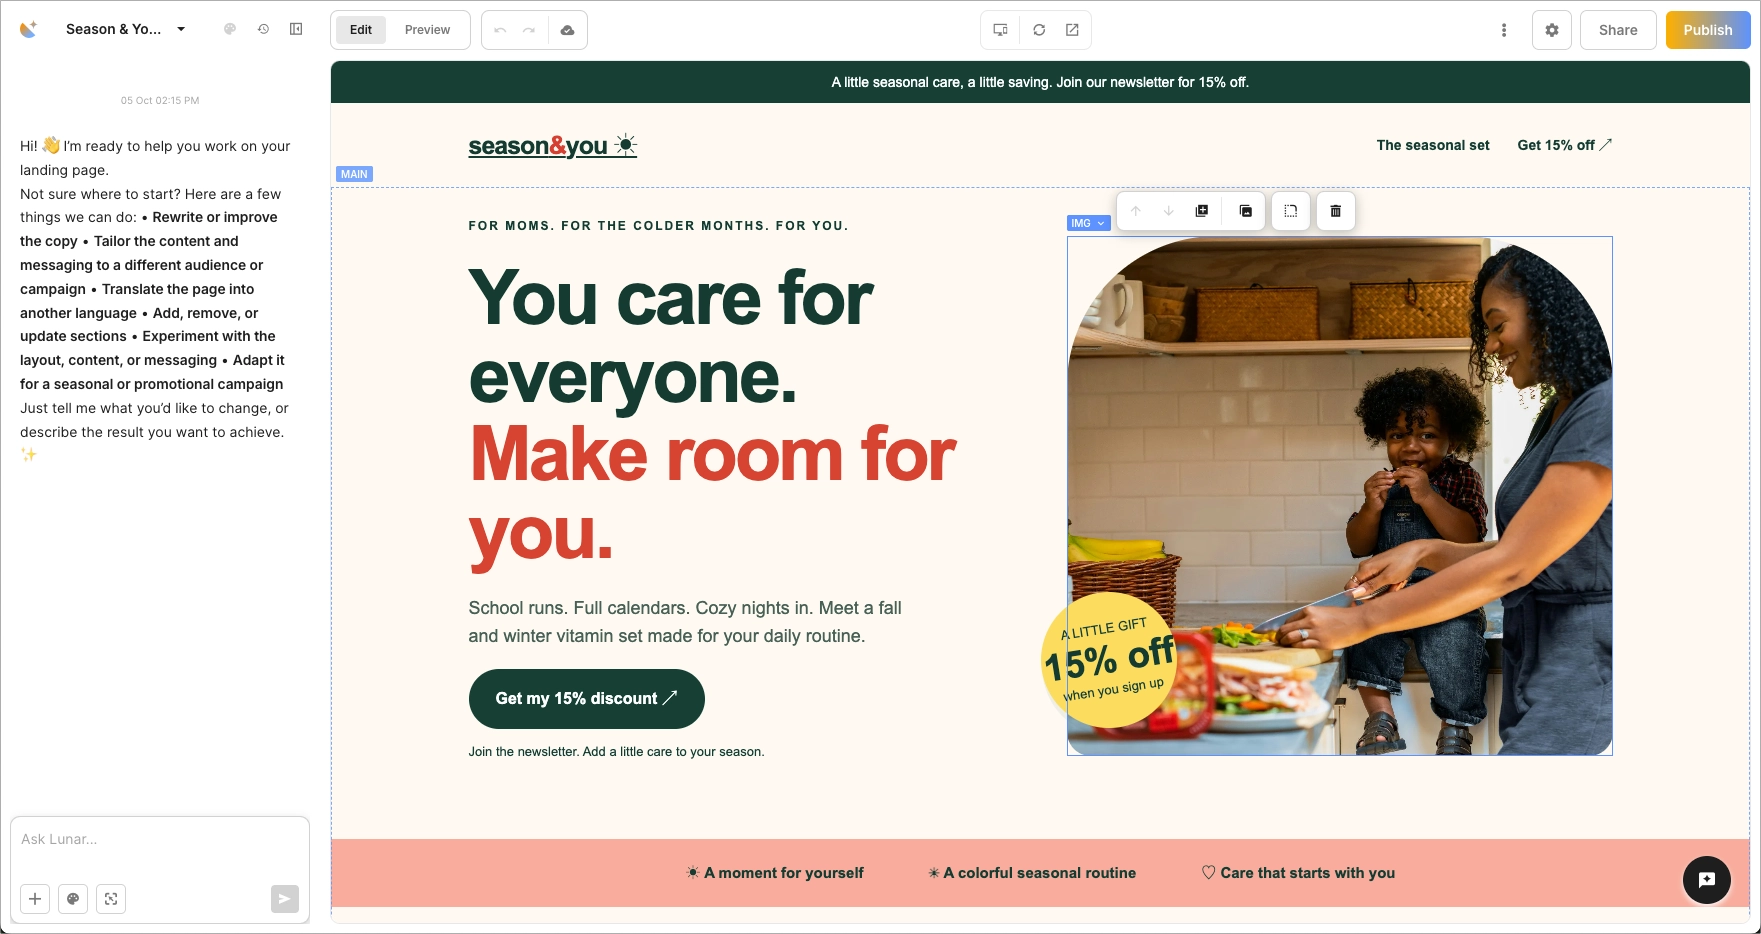
4. You can also open the generated landing page in Landingi and edit it with Lunar chat or manual Edit Mode. In this example, the page includes the photo attached to the ChatGPT prompt, as requested.
How to connect the Landingi MCP server to Claude
You can connect Landingi to Claude through a custom connector and manage landing pages directly in your conversations.
1. In Claude, go to Settings > Connectors. Click Add and select Add custom connector.
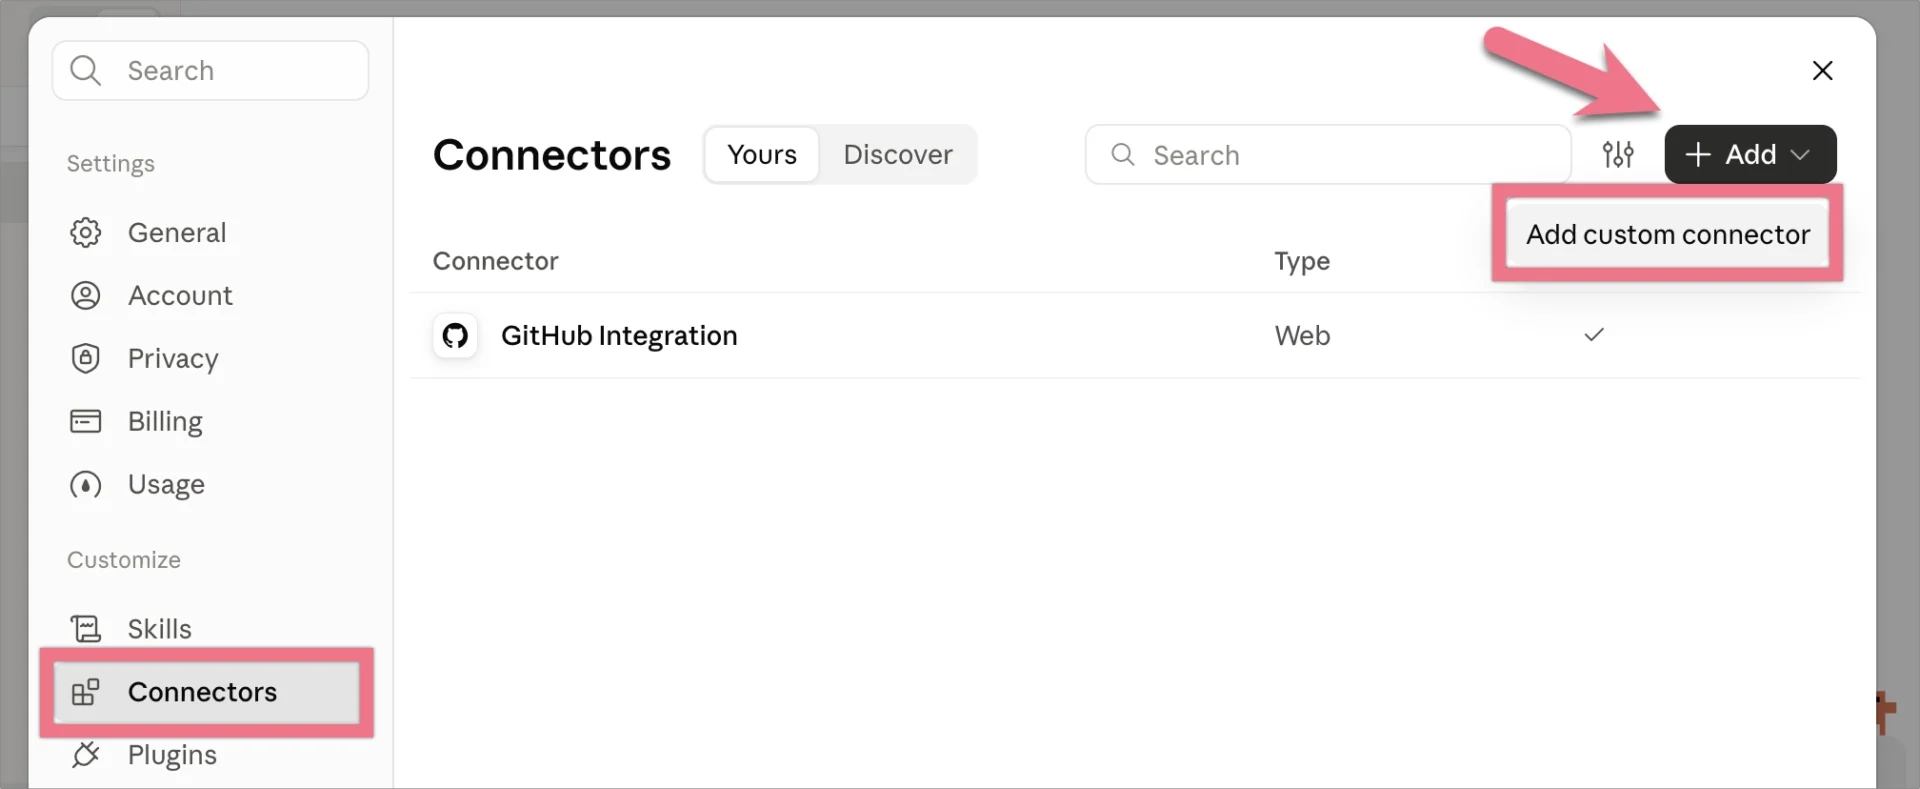
2. Name the connector e.g. Landingi MCP and enter the server URL: https://mcp.landingi.com/mcp. Click Continue.
Under Authentication, select Sign in now to authenticate through OAuth. Under OAuth client, keep Use Claude’s published identity selected, then confirm to add the connector.
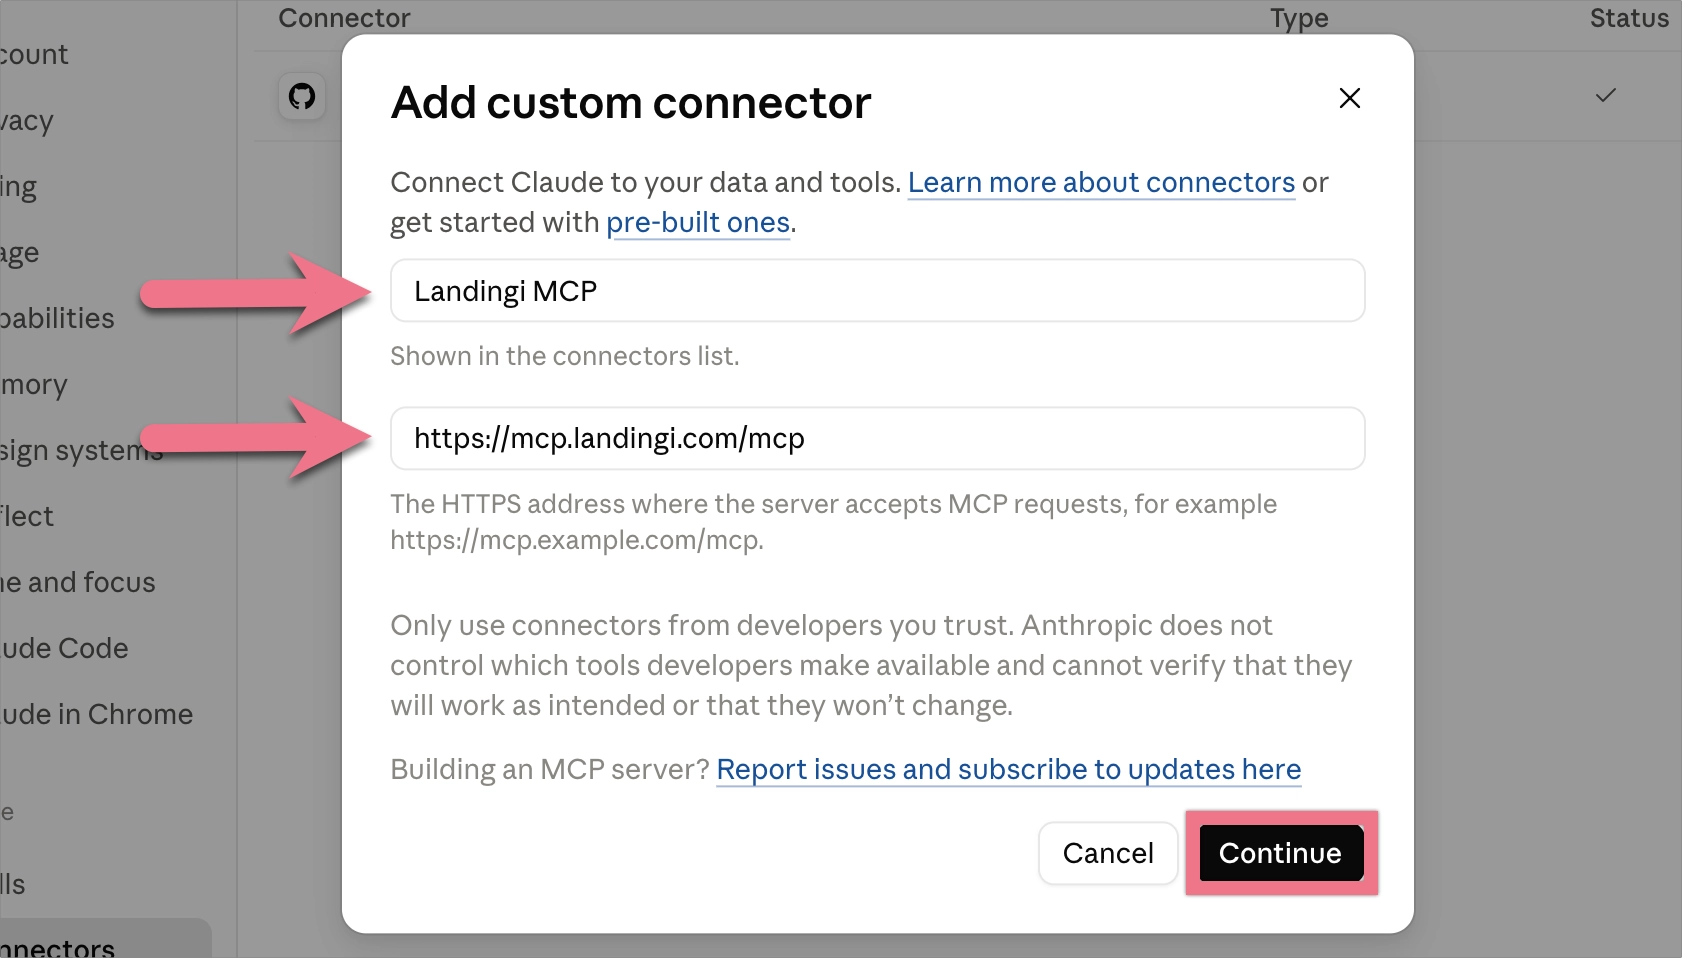
3. In a new window, in the Account / subaccount dropdown, choose your main account and all subaccounts or a specific subaccount. Review the listed permissions and click Allow.
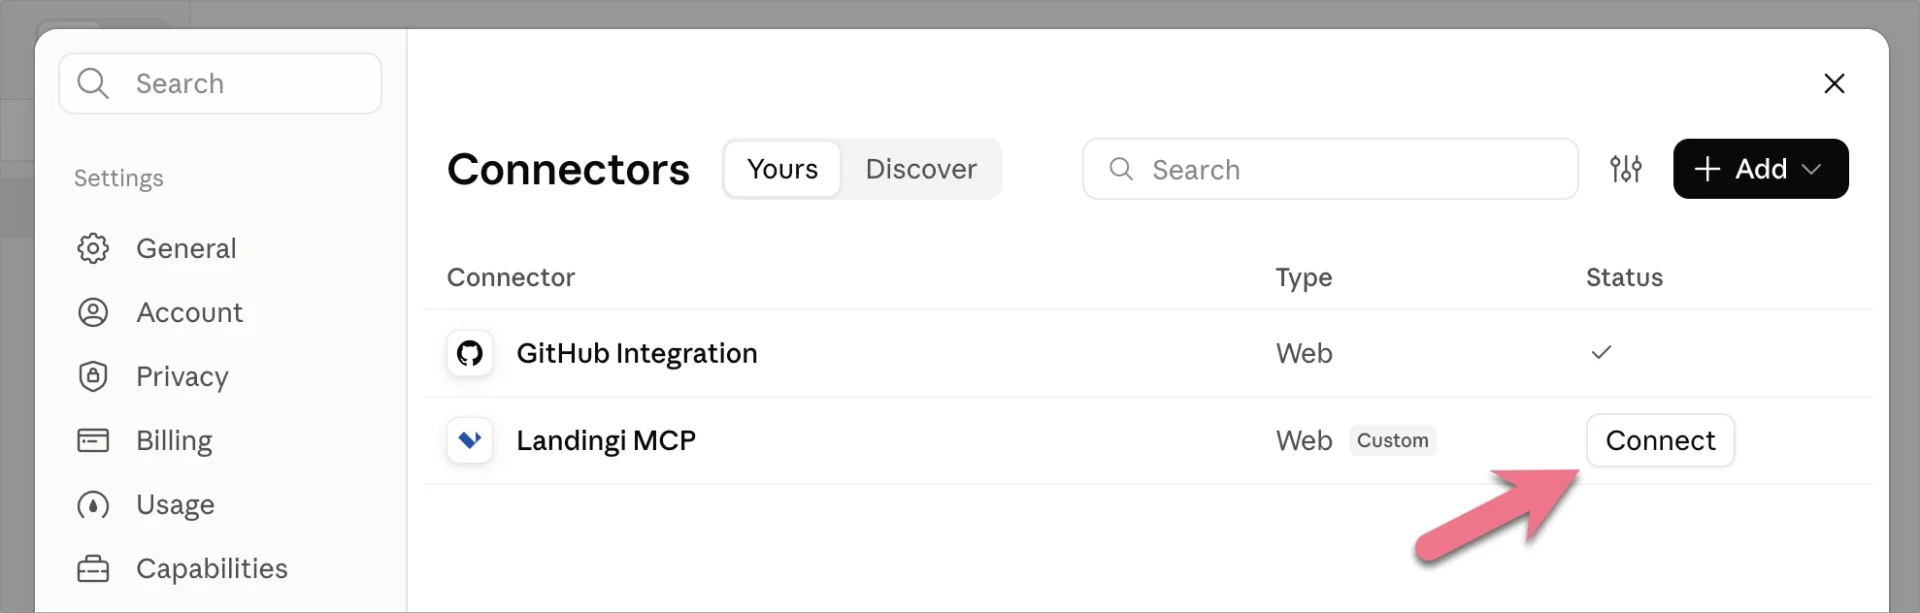
If not redirected to Landingi directly to authorize access, in Claude, on the connector list, click Connect next to Landingi MCP. Log in if prompted.
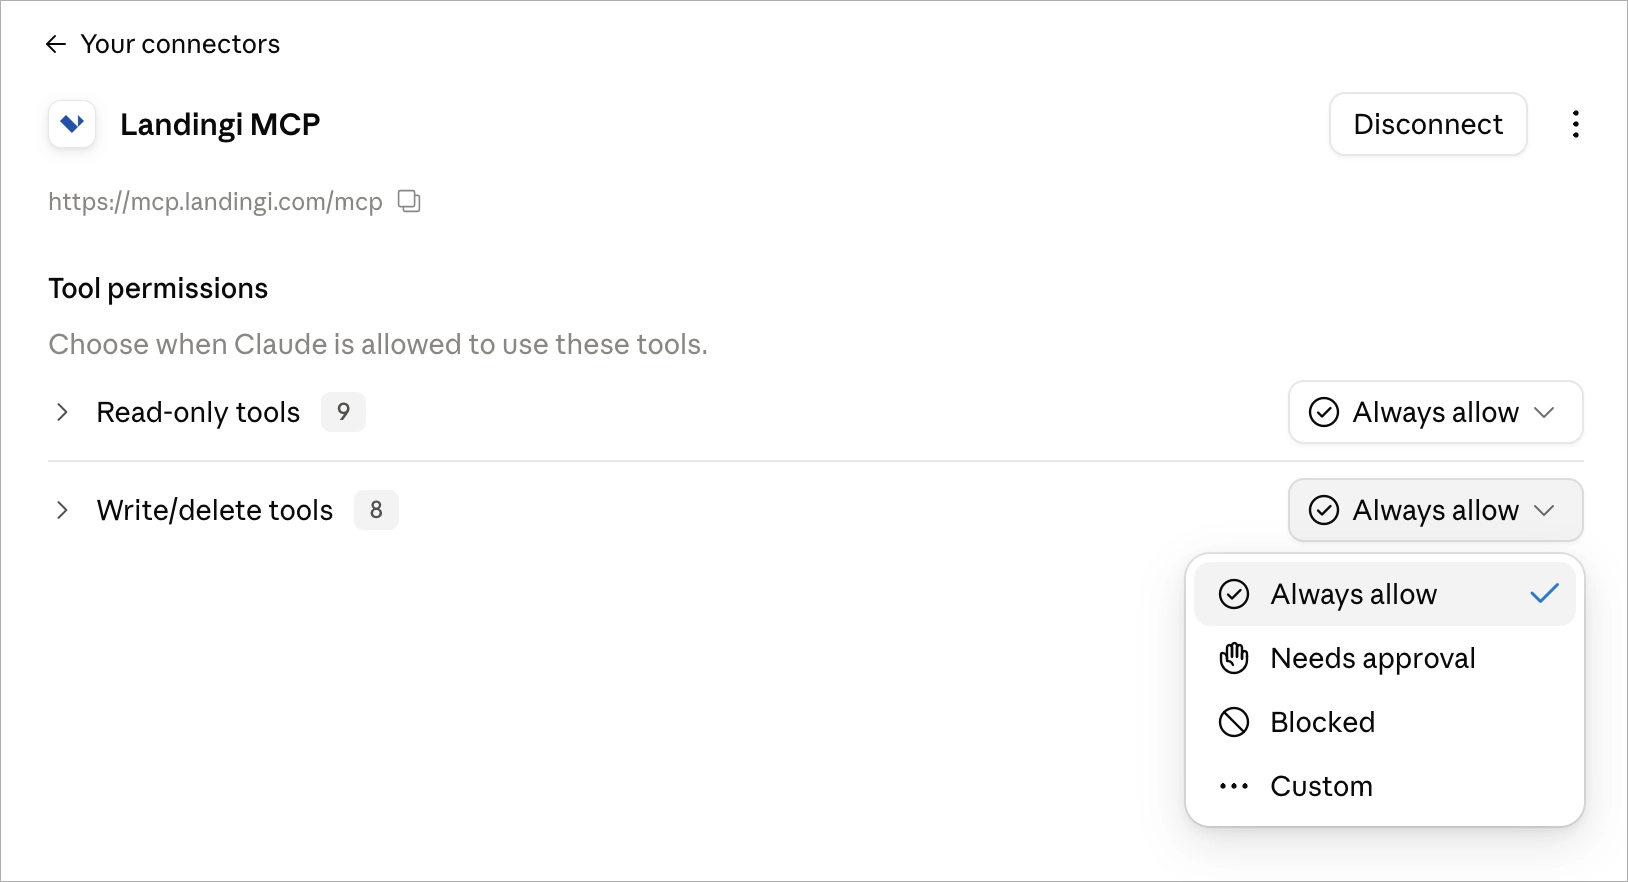
4. Return to Claude and open the Landingi MCP connector settings. Under Tool permissions, choose Always allow to let Claude use the tools without requesting approval each time.
5. To start using Landingi in your conversation, open a chat and ask Claude to perform a task in Landingi.
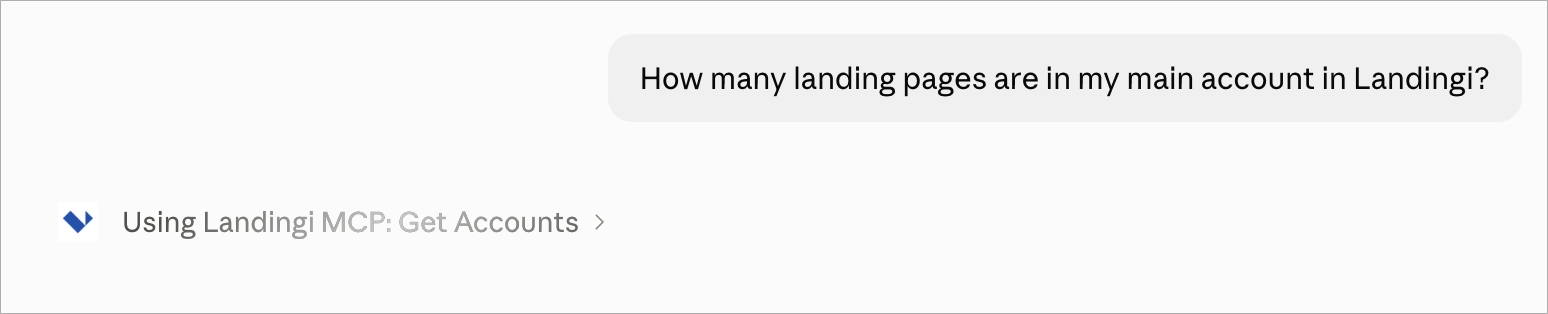
You can continue with follow-up questions or instructions, such as listing published pages, checking their performance, or creating a new landing page. If a tool requires approval, Claude will ask you to confirm before using it.
How to connect Landingi using an API token
If your AI tool requires an API token to connect to the Landingi MCP server, generate one in Landingi.
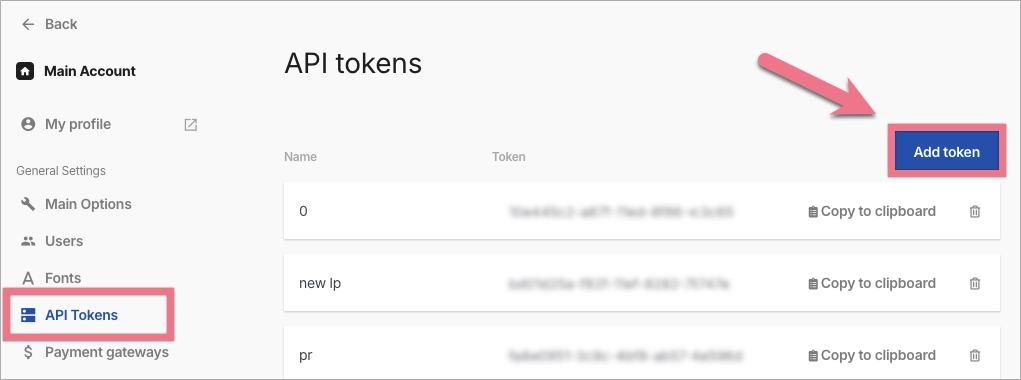
1. Open your account settings in Landingi and go to API Tokens. Click Add token.
2. Enter a name, such as Landingi MCP, and select MCP from the dropdown. Click Generate new token.
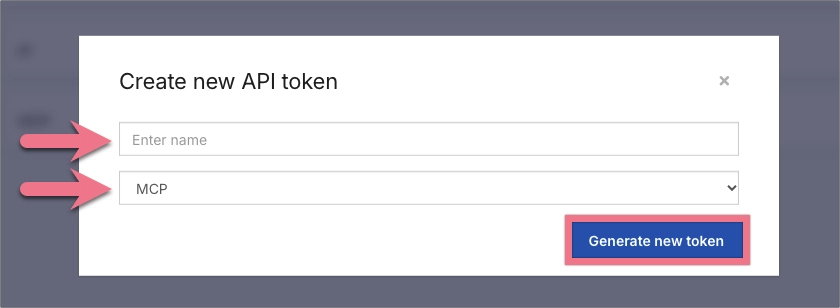
3. Find the new token and click Copy to clipboard.

4. Return to your AI tool’s MCP connection settings. Paste the token into the authentication field and complete the setup. The field name may vary depending on the tool.
IMPORTANT: Keep your API token private. Enter it only in the connection settings, not in a chat message.
Example prompts for managing landing pages in AI chat
The following prompts show how to use the Landingi MCP server to edit, publish, and manage landing pages from your AI workflow.
Edit a page
On the Lunar page “Marketing Webinar,” change the event date to November 20 and update the main button text to “Register for Free.”
Duplicate a page
Duplicate the landing page “Fall Offer” and name the copy “Winter Offer.” Keep the layout, change the discount to 20%, and save the copy without publishing it.
Publish a page and assign a URL
Assign the domain webinar.mycompany.com and the path /ai-marketing to the page “Marketing Webinar,” then publish it.
NOTE: Before assigning a custom URL, add and configure the domain in Landingi. See the domain and publishing guides for more information.
Check performance
Check the visits, conversions, and conversion rate for the page “Fall Offer” over the last 30 days.
You can then ask AI to explain the results and suggest changes. Include the page and reporting period in your prompt.
Create a page using brand guidelines
Generate a webinar landing page based on the attached brief. Apply the colors, typography, and design guidelines from the DESIGN.md file. Add a registration form.
Attach your brand book or guidelines file to the conversation. You can also enter the instructions directly in the message.
Work in a subaccount
In the “Client A” subaccount, list the published landing pages. Find “November Campaign” and create a copy named “December Campaign.”
Permissions and data access
The Landingi MCP server only performs operations supported by the connection and within the authorized account scope. It does not give AI unrestricted access to Landingi.
You can check page statistics, but the server cannot access lead records or form submissions. It cannot retrieve, export, or edit personal data collected through those submissions.
You can revoke access in your account settings. Information shared in the conversation is also subject to your AI provider’s privacy policy and settings.
